This post is also available in:
The bosses on Floor 700 and Floor 800 in Ram’s Spring and Dungeon are widely known as some of the nastiest walls in the game.
I finally managed to get through them, so in this article, I’m going to share the party setup and strategy I used to clear them.
This article contains boss spoilers, so proceed with caution.
First, Here’s the Team I Cleared With
The formation, from front to back, was:
Celine / Kotoza / Tsubaki / Mea / Little Devil / Konica
Everyone except Kotoza had Lv90+ in every stat.
As for Kotoza, only HP and Defense were raised to Lv100, while Attack and Critical Rate were left at Lv1.
Everyone’s Meal Level was Lv65.
Quick Recap: What the Bosses Actually Do
First, let’s go over what makes these bosses so rough.
Floor 700 Boss
The boss deploys a damage-negating shield.
If you hit it enough times, the shield eventually breaks and you can deal damage again—but after a while, it puts the shield back up.
And the more times it re-casts that shield, the stronger it gets, making it harder and harder to break through.
Floor 800 Boss
This boss heals itself.
And the longer the fight drags on, the more HP it restores.
On top of those gimmicks, there’s also the game’s nasty built-in rule where:
the longer the battle lasts, the harder the enemy starts hitting.
That means you’ll very often lose in the exact same way:
You can’t finish the boss fast enough, and eventually its damage output overtakes your ability to survive.
Yep.
It’s awful.
What Actually Works Against the 700F and 800F Bosses
To break through these bosses, you need to secure as many attacks as possible and as much damage as possible.
That’s the top priority. No question.
Even if it means sacrificing a bit of healing or tankiness, you need characters who can actually contribute damage.
That’s why I ended up focusing on Tsubaki and Little Devil.
Why Tsubaki?
Tsubaki is a bit fragile for a frontliner, but in exchange, she has:
- decent attack power
- solid movement speed
- which also means more attack opportunities
Why Little Devil?
Little Devil can heal while still attacking, which is extremely valuable here.
That means you can keep your damage output up without your healing completely falling apart.
Honestly, I think just having Little Devil or not changes the difficulty of these fights a lot.
Artifact Upgrade Priorities
- Demonic Spear Gungnir
(Lowers boss monster attack power. I maxed this out at Lv20.) - Attack Power / Critical-related Artifacts
→ around Lv17–18 - HP / Defense-related Artifacts
→ around Lv16–19
Equipment Upgrade Priorities
As mentioned above, this setup doesn’t exactly have luxurious healing, so I had to compensate by reinforcing survivability where needed.
Kotoza
Since Kotoza’s durability was on the lower side, I gave them:
- 1x Defense Up Lv8
- 2x Damage Reduction Lv4
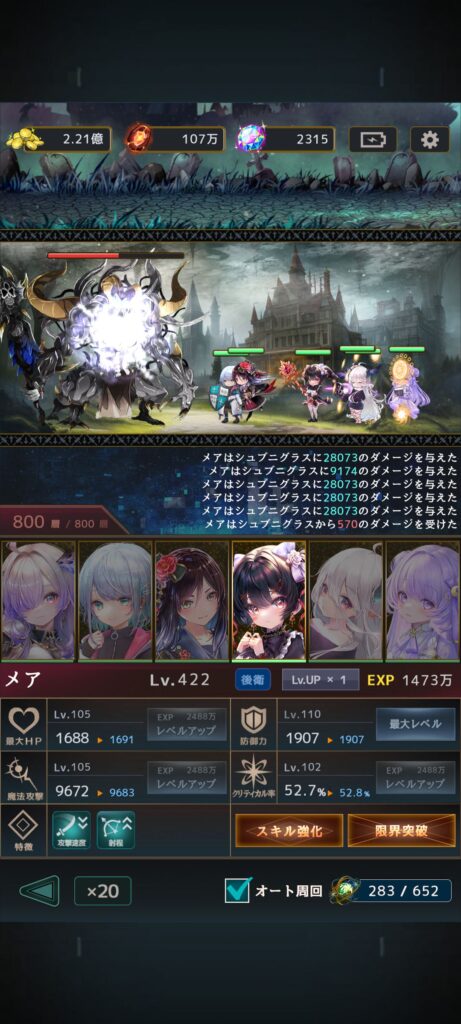
Mea (Main Attacker)
For Mea, who was my primary DPS, I equipped:
- Attack Up Lv6
- 2x Critical Damage Up Lv6
- Critical Rate Up Lv8
- and just to be safe, Damage Reduction Lv8
Celine
Celine was one of my main damage pillars despite also standing at the front, so I gave her:
- Defense Up Lv6
- Critical Damage Up Lv6
- Critical Damage Up Lv7
Other Upgrades
Skill Levels
I raised them to around Lv11–16.
Again: damage matters most here.
Limit Breaks
- Celine: 7
- Kotoza: 3
- Tsubaki: 4
- Mea: 8
- Little Devil: 6
- Konica: 4
Potential Unlocks
- Celine: 9
- Kotoza: 5
- Tsubaki: 4
- Mea: 20 (maxed out)
- Little Devil: 8
- Konica: 3
Option Awakening
For Celine and Mea, I unlocked all option slots and stacked them with:
- Attack Up
- Critical Damage Up
- Damage Reduction
- Defense Up
For Tsubaki, I unlocked 3 slots and gave her:
- Attack Up
- Defense Up
- Damage Reduction
The other three didn’t have any option slots unlocked.
Final Thoughts
For these fights, you really want to keep survivability at the bare minimum necessary and dump everything else into damage.
The Floor 700 and 800 bosses are seriously brutal—I ended up spending four months of real time trying to beat them.
So if this article helped you get through them too, I’d be very happy.
And with that, that’s it for this guide!!
Enjoy your gaming life!!
And thanks for reading all the way to the end!
Over on X, I post article updates and yell about whatever game I’m currently playing.
It’s about 1.3 times louder than the blog.
(According to our highly scientific internal estimates.)
