This post is also available in: 日本語 (Japanese)
I previously wrote a guide for reaching floor 400 in Ram’s Spring & Dungeon, and now I’ve finally cleared floor 500. Thought I’d jot down some notes from the run.
(Translated from Japanese article.)
Two Major Roadblocks at Floor 500
When pushing past floor 500, you’ll hit two big hurdles:
- Enemy Damage Scaling: Enemy attack power keeps rising linearly, while your HP and Defense are basically capped from level-ups. Eventually, you just can’t tank hits anymore.
- Boss Mechanics: Floor 500 boss has special gimmick — its damage ramps up over time, so you can’t drag out the fight. You have to finish them quickly.
These are the two main challenges. Let’s break them down one by one.
The “Defense Cap” Problem
Around floor 440, you’ll notice your HP and Defense are approaching their level-up limits.
It’s not just about hitting the cap — the higher a stat already is, the slower it grows with each level.
Your first- and second-position tanks might still survive on raw stats alone, but the real problem lies with the third- and fourth-position units.
Depending on your gacha luck and how you’ve leveled your characters, you might have to slot in relatively tanky healers in these positions.
When that happens, you risk the classic scenario:
Lucky hit takes down a healer → no healing → frontline collapses → forced retreat
…which is super frustrating.
The DPS-Check Boss
The floor 500 boss is basically a DPS check.
Its attack power rises rapidly over time and it has AoE attacks, so no matter how tanky your frontliners are, you won’t survive if your damage output is too low.
The solution here is simple: boost your team’s DPS — there’s no other way around it.
Three Key Strategies to Clear Floor 500
So, how do you actually break through floor 500? At this point, there are three main ways to strengthen your team:
- Collect Artifacts and upgrade them with Magic Stones
- Enhance skills
- Use Limit Breaks
At this stage, simple level-ups are basically capped, so we can ignore them.
You could try Equipment upgrades, but:
- Getting effective gear relies heavily on luck
- Even if you get good gear, you might not have enough Rikka Orbs to unlock slots
- This makes it hard to achieve consistent, reliable power increases
So, let’s focus on the three main methods listed above.
Collect Artifacts and Upgrade Them with Magic Stones
The fastest and most immediately effective way to power up is via Artifacts.
As usual, the upgrade priority should be:
Durability-focused >>> Healing >>> Attack
(Critical-hit boosting Artifacts are still unreliable at this stage, so they can be lower priority.)
When I cleared floor 500, the key Artifacts looked like this (see screenshots):


- A-rank: Debuffs enemy attack
- B-rank: Boosts your team’s attack power
- C-rank: Raises critical defensive stats (HP/Defense)
Notice how the C-rank defensive Artifacts form the backbone — they’re also the most common and easiest to acquire, so getting a set of these is straightforward.
For now, just collect and upgrade Artifacts following this structure — it’s the core of surviving and pushing past floor 500.
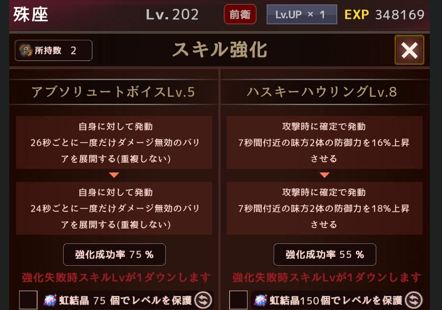
Skill Upgrades
Around this floor range, it’s time to start upgrading skills.
If you’ve developed your Research Lab and Bank reasonably, you should have enough passive income to spend freely on skill upgrades.
Priority #1: Defensive buffs (for yourself or allies).

For example, tanks’ skills that boost their own Attack/Defense are particularly valuable. Attack boosts for tanks don’t do much in practice, but any Defense increase significantly improves stability.
Upgrade skills gradually — somewhere around level 3–8, depending on your resources.
Once the defensive buffs are taken care of, you can funnel any leftover funds into your main attacker’s damage-dealing skills.
This approach maximizes survival while still improving DPS for the boss.
Using Limit Breaks & How to Get Limit Hearts
The final piece of the floor 500 preparation is Limit Breaks.
Limit Hearts, required for Limit Breaks, can be obtained:
- From duplicate gacha pulls
- At the Exchange Shop under in “Treasures” section, traded for gold

Each Limit Break gives huge boosts:
- +10% HP
- +10% Attack (or Healing Power)
- +10% Defense
- +10% Critical Damage (not Critical Rate)
Looking back at the Artifact screenshots, most boosts are around 15–25%.
So, doing 2–3 Limit Breaks per party member roughly matches the strengthening effect of fully upgraded Artifacts.
Worried because some low-rarity characters are in your lineup? Don’t be.
- Limit Break cost depends on character rarity, so low-rarity units are extremely cheap to enhance
- Even characters that might eventually leave your main lineup can get good bang for your buck early on
Use this strategically — it’s a cost-effective way to shore up your team for the 500F boss.
For Those Thinking “We Might Just Win, But It’s Not Stable”
You might be thinking:
“Maybe I should just stay on floor 400 and keep grinding upgrades…”
But try pushing past floor 500 at least once.
Why? Because once you clear this floor:
- Magic Stone acquisition skyrockets
- Food production stabilizes, making future farming and runs much more reliable
It’s a one-time hurdle with long-term benefits.
Benefits of Clearing Floor 500
We’ve gone through how to break floor 500, but what actually changes once you do?
The main benefits are:
- Increased Magic Stone gain
- Unlocking food production
Let’s go through them one by one.
Increased Magic Stone Gain
Clearing floor 500 roughly doubles the total Magic Stones you gain compared to floor 400.
- At 400F, you spend 80 Blessing points
- At 500F, you spend 100 Blessing points
Calculating efficiency:(2/ 100) / (1/80)=1.6
So your Magic Stone gain per Blessing point increases by 1.6× — a huge boost!
This means you can finally afford Artifacts you previously couldn’t reach.
But what if running 500F isn’t stable yet?
That’s where food production comes in.
Stable Farming Through Food Production
Once you defeat the 500F boss even once, the food production system unlocks.
In short:
- You can use materials gathered over time to cook meals
- Feeding these meals to your characters raises their Meal Level
- This grants multiplicative, permanent buffs to all stats
The key here is that these are multiplicative, permanent buffs.
Once your food production is running smoothly, just feeding your team once or twice a day gradually increases their stats.
This becomes the next main growth path, replacing level-ups that have hit their cap.
Raising Meal Level to around 5–6 makes 500F farming much more stable, so take your time — no rush, just stick to the bonsai routine.
Food Production Tips
The tutorial explains the basics, so here are some practical tips from experience:
- Build two workbenches first
- This ensures high Research output, which is the primary resource for food production. Higher Research output makes your food system much more effective.
- Secure enough chairs in the dining hall
- Without chairs, you can’t feed multiple characters at once.
- One chair works at first, but constantly swapping characters is tedious.
- Aim for five chairs to cover your full party. More depends on your play style.
- Start with barrels before expensive cooking stations
- Cooking stations cost 10 million G, so initially buy barrels to establish a steady, low-cost system for gradual character strengthening.
- Best early crops
- Nininji first, then Shumugi.
- These two can be produced using only barrels, making early production easy.
- Later, raise barrel levels and expand your crop variety gradually.
- Save advanced crops for later
- Tomatto and Kyabere require cooking stations, so start growing them only after you can afford a cooking station.
Following this order sets up a smooth, sustainable food production system for steady stat growth.
Closing Thoughts
That’s about it.
Once you get past floor 500, you’ll notice that the time required to gather resources for facility upgrades and further character strengthening starts to increase significantly.
From here on, it’s true bonsai mode — slow, steady, and patient growth. Take your time and enjoy it.
Enjoy your Gaming life!!!
Thanks for reading all the way to the end!
