This post is also available in:
This article contains affiliate links.
The other day, I finally cleared every ending in The Use of Life after running through the game with all of the advanced classes.
So, I figured I’d clean up the notes I’d been jotting down along the way and turn them into a proper strategy guide.
Hopefully this helps anyone who’s stuck, or anyone who’s still unsure about what kind of build they want to go for.
I’m also going to keep this as spoiler-light as possible, so no worries there.
As for the actual ending requirements, I’ve tucked those away in a collapsible section. Open it at your own risk if you’re curious.
Anyway, let’s get into it!!!
Basic Gameplay Tips
If you want easier normal battles, raise your damage. If you want easier boss fights, raise your survivability.
This is the single most important tip.
In this game, every money and item acquisition event can only be used once.
Which means you can’t just farm HP and MP recovery items forever.
So if regular fights are dragging on, you’ll slowly burn through your precious healing items and make the game way harder on yourself.
For normal enemies, it’s usually best to go all-in on damage and wipe them out fast. That way, you take less damage overall.
Boss fights are the opposite. They tend to hit you with extremely powerful attacks that can delete you in an instant.
So if you want to dodge or guard consistently, you’ll want to shore up your defenses.
Shop items and event reward items are huge hints
Accessories sold in shops that boost elemental resistance, plus equipment and consumables you get from events, are all extremely effective against bosses. I’ve done four full runs, so I can say that pretty confidently.
If the shop is selling an accessory that boosts ice resistance, that’s basically the game telling you:
“There’s a boss coming who uses ice attacks.”
Use that information.
Don’t make your equipment too heavy
In general, heavier equipment tends to give you better offensive and defensive benefits.
The tradeoff is that it gets much harder to time your guards and dodges properly.
Guard timing is fairly forgiving on its own, but plenty of enemies use unblockable attacks often enough that a guard-centered strategy just isn’t reliable.
For reference, the ability that lets you guard even unblockable attacks can only be obtained by progressing the scenario very far with the advanced skill Curseblade.
The turn right after the enemy’s red-text action is your burst damage window
When the enemy’s predicted action is shown in red text, the action immediately after that takes increased damage. This remains true even if it carries over into the next turn.
So if you dump your biggest damage into that timing, you can deal damage much more efficiently.
Basic Classes: Feel and Stat Allocation
Across my four playthroughs, I picked a different starting class each time.
Based on that experience, here’s my look back at how each basic class feels to play and how I’d recommend building them.
Fighter
The Fighter gets heavy single-hit damage skills, multi-hit skills, and a few counter-style options.
The big single-hit skills are powerful and CP-efficient, but they’re marked with red text. In the screenshot below, that includes Smash, Heavy Smash, and Cross Break.

Skills with red names come with drawbacks: guarding and dodging the enemy’s next attack gets harder, and you also take more damage.
Because of that, using them at the same time a boss is winding up for a big enraged attack—especially after charge actions like “Chant”—can get you punished hard.
Meanwhile, the multi-hit skills are shown in white text, which means they don’t come with penalties like increased dodge difficulty or increased incoming damage.
So if you still want to attack on the turn the enemy is threatening a big move, use the white-text skills instead.
As for Counter Step, the damage per hit isn’t that much different from a normal attack.
That means if you use it against an enemy’s multi-hit attack, it’s not unusual for it to deal less total damage than something like Quadruple Edge instead.
For stats, the most stable setup for me was to spread points evenly between STR, VIT, and SPD.
Samurai
Samurai revolves around Iai, a set of attack skills built around boosting crit rate and crit damage.
The sheathing stance you need before attacking also makes it easier to evade enemy attacks, so it can double as a defensive buff of sorts. Because of that, the class is surprisingly flexible.
In the very early game, though, it feels a bit weaker than Fighter in terms of raw damage, simply because your crits aren’t consistent yet.
As you start investing your curse into TEC, your crits become much more reliable, and the class starts pumping out excellent damage consistently.
Iaido skills scale from both STR and TEC, but if you split evenly between the two, your crit rate ends up too low and your real damage suffers.
So to keep your crit rate high enough, I found it much easier to focus your offensive stat investment entirely on TEC.
Another nice bonus of raising TEC is that it also increases the chance of revealing enemy action predictions.
With the easier evasion from sheathing, that means you can read enemy attacks, dodge them, fill your boost gauge fast, and then slice enemies in half with boosted crit damage.
Simple. Strong. Very effective.
Because of that, I recommend splitting stats evenly between TEC, VIT, and SPD.
Mage
A very straightforward magic class.
Especially in the early game, its damage is clearly ahead of the pack. If you focus hard on INT, you turn into a walking murder machine that can casually one-shot regular enemies.
…That said, if you lean too hard into INT, the class can get wildly swingy.
You might get blown up by bosses in two hits, and once Chapter 2 starts, you may suddenly stop one-shotting regular enemies altogether. So there’s definitely a “glass cannon dream build” side to Mage.
One important thing about the spell lineup: the spells you learn at skill level 1 actually have the best damage-per-MP efficiency.
Especially early on, spamming something like Fireball can often be more efficient than using higher-tier spells carelessly.
It’s much easier if you treat high-tier spells as tools specifically for burst damage via Chant + Boost.
Also, if you fully master Mage, fire spells get a damage bonus… but in practice, the increase is only around 5% or so.
So if the enemy is weak to ice, you’re still going to do way more damage by just using an ice spell normally. Keep that in mind.
Chant itself also only boosts damage by around 10%, so outside of burst windows, the damage gap isn’t that dramatic.
For stats, the most stable spread was INT, VIT, and SPD evenly.
Sorcerer
At first glance, Sorcerer looks like a sustain-oriented caster that slowly grinds enemies down with debuffs and HP drain.
But then it also gets access to Sword of Life, which is just an absurdly strong damage spell.
Sorcerer stands out most for how rough the very early game feels.
You don’t have many healing items, and it takes a while before you learn Absorb, your HP-draining spell.
So the class ends up stuck in this miserable situation where you do have tools to chip enemies down over time, but don’t have a proper way to recover—so you just lose the damage race.
The big breakthrough comes when you learn Sword of Life.
Sword of Life costs 10% of your HP, 0 MP, and has no cooldown, while dealing extremely high damage for the cost.
When I tested it against the chickens in Chapter 2, the numbers looked like this:
- Mage’s Fireball (starting spell) → 260 damage
- Mage’s mid-tier spell (forgot the name) → 430 damage
- Sword of Life → 590 damage
Yeah. It’s kind of insane.
And again: no cooldown.
Which means you can cast it three times in one turn if you want.
So once Sorcerer gets Sword of Life, it basically becomes fearless.
Even after advancing into an advanced class, Sword of Life stays relevant the whole game thanks to its great damage and efficiency.
On top of that, you get Mirage Mist for defense and evasion buffs, which gives you solid survivability, and eventually Absorb, the game’s only actual HP-drain spell, which just pushes the class over the edge.
When people hear “HP-drain spell,” they tend to imagine low damage.
But Absorb hits almost as hard as Sword of Life.
It does have a cooldown, so you can’t spam it nonstop, but it deals huge damage and heals you for a ridiculous amount—usually enough to comfortably top off your max HP.
That makes it fantastic both as a comeback button in emergencies and as a main damage tool.
For stats, just like Mage, the most stable spread was INT, VIT, and SPD evenly.
Comparing the Advanced Classes
I’ve already written individual articles for each advanced class, so I’ll leave the finer details to those dedicated pages.
Here, I just want to compare them in terms of damage, durability, efficiency, and ease of use.
Since I spent four full runs sticking with a single advanced class from start to finish each time, I think these evaluations are pretty fair.
Sage
Skill Breakdown – Sage | The Use Of Life – Kaburanai Games
Damage
Excellent at both sustained, low-cost damage and burst damage when needed.
Durability
The only class with access to true healing and regeneration. It also gets evasion buffs, defense buffs, and even HP-drain spells.
Efficiency
Has a passive skill that improves MP recovery, so by midgame onward, MP becomes much easier to manage.
Ease of use
Since it can heal itself and also produce burst damage without relying too much on luck or player execution, it’s by far the easiest class to use well.
Swordmaster
Skill Breakdown – Swordmaster | The Use of Life – Kaburanai Games
Damage
To reach peak damage, it has to spend all of its action slots in a single turn, which makes it hard to realize that damage in actual combat.
Durability
No healing, and its defense buff only comes through combo skills, so it feels pretty rough.
Efficiency
Gets a lot of CP back from its evade-based CP recovery effect. Even if you miss a few dodges, the CP income is still respectable.
Ease of use
Most of its strengths come from good resource economy, but since it lacks self-healing, it’s hard to find a really clear and reliable win condition.
Swordmage
Skill Breakdown Swordmage | The Use of Life – Kaburanai Games
Damage
Apply enchantments, chain multi-hit attacks, watch the enemy explode. This class is way more of a damage maniac than its “jack-of-all-trades” image might suggest.
Durability
It feels a bit shaky before the midgame, when you finally get defense and evasion buffs. After that, it improves dramatically.
Efficiency
If you get carried away, you run out of gas very quickly. You’ll need a lot of MP recovery items.
Ease of use
Its strength is simple and obvious: raw damage. It can also use both physical-oriented and magic-oriented weapons well, so you rarely run into the problem of getting an event weapon that doesn’t fit your build.
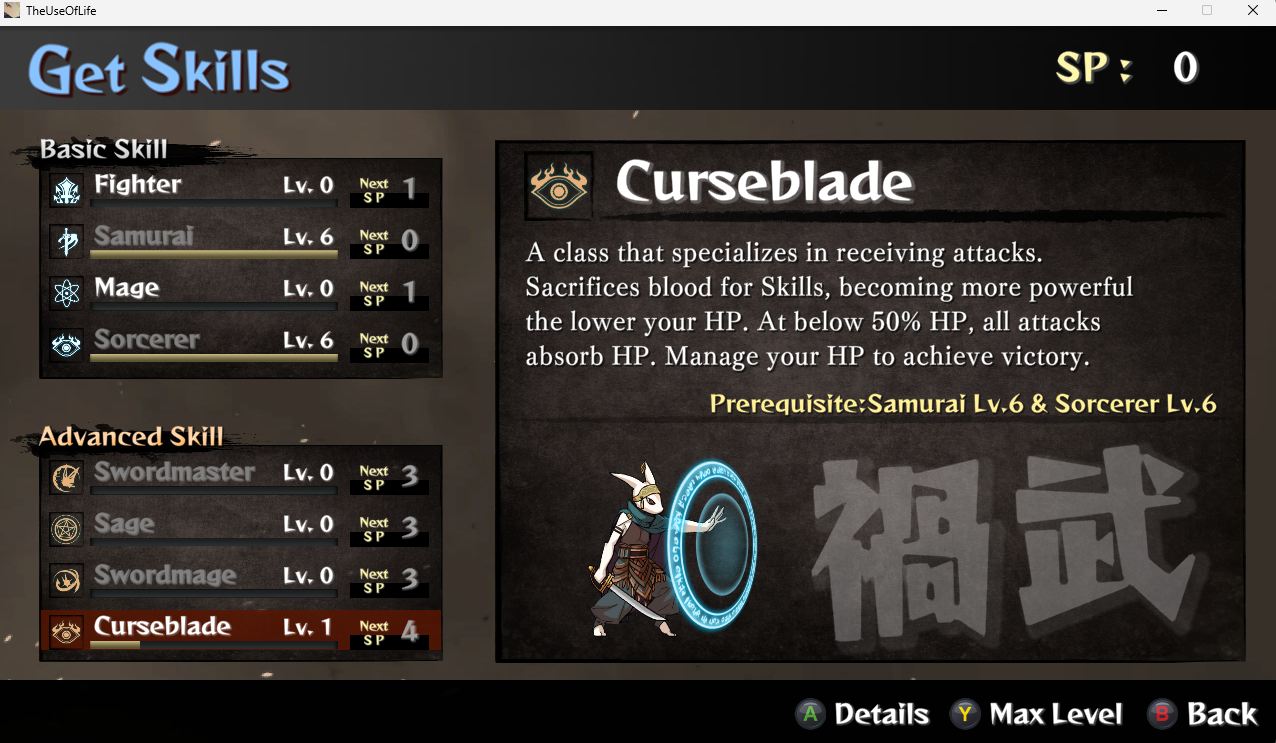
Curseblade
Skill Breakdown Curseblade | The Use of Life – Kaburanai Games
Damage
Even without counters, its damage is still decent enough. But to hit peak damage, you need to keep landing Just Guards and chaining counters, so its real output depends a lot on the player’s sense of timing and rhythm.
Durability
Gets HP drain, defense buffs, evasion buffs, and access to debuffs and status effects that are especially strong against bosses.
Efficiency
It doesn’t have a passive specifically for improving resource efficiency, but its skills themselves are cheap enough to use comfortably.
Ease of use
It doesn’t have any glaring weaknesses, so there are relatively few moments where it truly struggles. That said, it’s also pretty quirky—you need to manage equipment weight, balance physical and magical offense, and deal with a peak-damage playstyle that starts to feel like a rhythm game.
What to Do When You Get Stuck on a Boss
Prioritize counters to status ailments and elemental attacks
This should be your first priority.
In particular, protecting yourself against Blind and Paralysis dramatically lowers the odds of your whole battle plan falling apart.
Respec and put more points into SPD and VIT
If the boss is hitting way too hard or you just can’t dodge anything, the first thing you should do is respec toward defense.
A good rule of thumb is to aim for roughly a 1:1:1 ratio between your offensive stat, SPD, and VIT.
Memorize the directional input patterns for dodging
The direction tied to each enemy attack name is not random at all. It’s completely fixed.
So if you remember things like, “When this boss uses that finisher, I need to press up,” dodging gets a lot easier.
A good way to remember the patterns is this: the directional prompt corresponds to the part of the body being targeted.
- Attacks aimed at the head or neck → Down
(Crouch under it) - Attacks aimed at the torso → Left
(Twist your body to evade) - Attacks aimed at the legs or shockwaves traveling along the ground → Up
(Jump over it)
Once you keep that in mind, you can often predict the directional input just from the attack name.
Don’t hoard consumables
The in-game help mentions this too, but it’s absolutely true: not just healing items, but debuff items and offensive consumables are all at their strongest the moment you get them.
If you sit on them forever, they eventually just turn into underwhelming sell fodder.
So don’t be stingy—use them like you mean to use them up.
Make use of skill-based dodge and defense
Enemy big moves become much easier to handle if you use the Dodge and Defense skills properly.
In particular, despite what the name suggests, Dodge also makes your guard timing easier to line up, so don’t overlook it.
Using Boost for defense is extremely effective
It’s easy to focus only on offensive Boost, but defensive Boost’s damage halving effect is incredibly strong.
A lot of bosses have super-fast big attacks that are hard to answer cleanly, and in many cases I got through them by stacking Defense Boost + skill-based Defense + Guard.
It works more often than you’d think.
Ending Route Conditions (Spoilers Ahead)
There are four endings in total.
First, once Chapter 1 ends, the route splits like this:
- If your Flame of Life is greater than your Flame of Power → Kohaku Route
- If your Flame of Power is greater than your Flame of Life → Misha Route
After that:
In the Kohaku Route, the names of your Flames change to Flame of Survival and Flame of ??? (Kohaku).
Right before the final boss, the ending branches depending on which of those two values is higher.
In the Misha Route, the ending branches right before the final boss depending on whether Flame of Life or Flame of Power is higher.
Final Thoughts
So yeah, those are my strategy notes for The Use of Life.
Hope they help, fellow gamers.
As part of my IndieGame100 series, I went all-in trying to put into words what makes this game so damn good—so if you’re even a little curious, go check it out.
If this game has sparked your interest in gamebooks, I would recommend giving something like Sorcery! a try. It should give you an even deeper taste of the genre’s distinctive style of play.
Enjoy your gaming life!!
And thanks for reading all the way to the end!