This post is also available in:
Have you jumped into Kenshi’s brutal post-apocalyptic world, only to find yourself yelling, “What am I even supposed to do?!”
This guide will walk you through eight steps for surviving the toughest part of the game—the early game—and reaching a stable position. Along the way, you will also learn the basic controls and systems you need to keep playing.
I hope it helps!
Please note that this guide assumes you selected The Wanderer as your starting scenario.
All right, let’s get started.
- Step 1: Understand What You Need to Survive the Early Game
- Step 2: Recruit Ruka, a Free Companion in Squin
- Step 3: Mine and Sell Copper and Iron Around Squin
- Step 4: Obtain Enough Food, First Aid Kits, and Weapons
- Step 5: Recruit Two More Companions from the Bars in Squin and Stack
- Step 6: Buy a House in Squin
- Step 7: Research and Build Storage Containers
- Step 8: What to Do Next
Step 1: Understand What You Need to Survive the Early Game
The things you need to survive the early game—and the most realistic ways to obtain them—are roughly as follows:
- Food → Buy it with money.
- First Aid Kits → Buy them with money.
- Companions → Hire them with money. There are only a limited number of free recruits whom you can reach without putting yourself in serious danger along the way.
- Weapons and armor → Buy them or craft them at a base. Store-bought equipment is enough to get you through the early game. Once you reach the base-building and crafting stage after completing these steps, you will eventually be able to craft some of the strongest armor in the game, provided you are willing to invest the time.
That is the general idea.
Recruiting companions is especially important.
In addition to increasing your combat strength, companions can mine alongside you or take over parts of the process of crafting and selling equipment. This can greatly improve the efficiency of your money-making operations.
On the other hand, recruiting too many people before you establish a self-sufficient lifestyle will dramatically increase your food consumption. It will also increase the amount of micromanagement required, place more pressure on your finances, and potentially consume all the food available in nearby shops.
During the early game, I recommend keeping your party at around four to six members.
Step 2: Recruit Ruka, a Free Companion in Squin
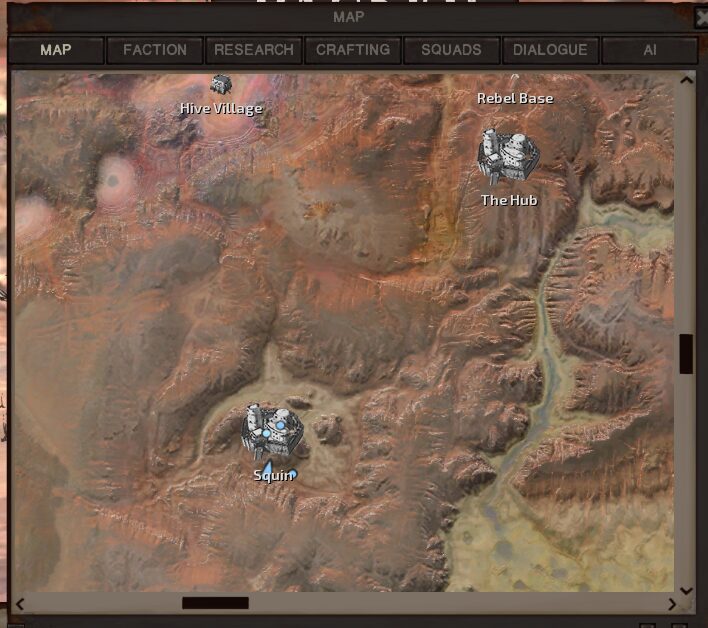
Before doing anything else, let’s increase your party size to two.
Doing so will dramatically improve both the efficiency of your future money-making operations and your chances of surviving an attack while working.
From The Hub, the town where you begin the game, travel southwest until you reach a town called Squin.
There, recruit a Shek named Ruka. If she isn’t there, she may be in Admag or Last Stand
She can be found in one of the town’s two bars: either the building with a sign reading “PUB”, or the bar with a sign depicting a person sleeping in a bed.
Right-click her, speak to her, and ask her to join you.
Ruka is one of the rare characters you can recruit for free during the very early game. She also begins with relatively good equipment, allowing you to delay replacing her gear.
Both of these advantages will give you some much-needed financial breathing room.
Her combat-related skills are also slightly better than those of a completely untrained recruit.
However, even Ruka can still be knocked unconscious by Hungry Bandits immediately after being recruited, so do not expect too much from her at first.
Since she is a Shek, she will develop into a capable warrior fairly quickly.
Until then, you will simply have to be patient.
How to Control Your Second Party Member and Beyond
Left-click one of the character portraits at the bottom of the screen to switch your selected character.
You can then control that character in exactly the same way as your original protagonist.
To switch back to your protagonist, simply left-click their portrait again.
Step 3: Mine and Sell Copper and Iron Around Squin
Now it is time to make some money.
Mining and selling copper and iron is one of the safest and most reliable ways to earn money at the very beginning of the game.
Copper sells for more than iron, so I recommend prioritizing copper whenever possible.
Use Prospecting to Find Mining Locations
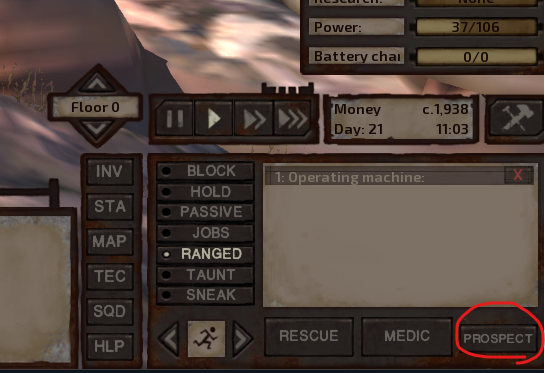
The button is located in a slightly confusing part of the interface, but pressing the Prospecting button highlighted by the red circle will display nearby resources in green on the minimap.
The arrow on the minimap represents the current position and direction of your camera.
You can move the camera with the WASD keys and rotate it using the Q and E keys.
Use these controls to locate deposits of copper and iron, then begin mining.
Assigning Mining Jobs
Hold the Shift key, right-click a resource deposit, and select the mining option.
Your character will then begin mining it as a permanent job.
You can increase the game speed to three times normal speed by clicking the button on the far right of the game-speed controls in the lower-right corner of the screen.
Honestly, mining feels painfully slow unless you use three-times speed, so I recommend keeping the game at maximum speed while your characters are working.
To temporarily stop a character from performing their assigned mining job, click the Jobs button in the command panel in the lower-right corner of the screen to turn it off.
You can then move the character freely.
When you want the character to start mining again, click Jobs once more.
To remove the mining assignment entirely, delete it by clicking the X next to the mining task in the job list on the far right of the screen.
How Do You Collect the Ore You Mine?
The interface is extremely confusing, but simply mining a deposit does not automatically place the resulting ore in your character’s inventory.
To collect it, you must follow these steps:
- Left-click the resource deposit to open its mining status and inventory window.
- Press the I key to open the inventory of the character doing the mining.
- Right-click the ore inside the deposit’s window to transfer it from the deposit into the character’s inventory.
It is incredibly unintuitive, but you will simply have to get used to it.
Hang in there!
During step three, you can hold Shift while right-clicking to move all accumulated ore into your inventory at once.
Remembering this little shortcut will greatly improve your quality of life.
How Do You Sell the Ore You Collect?
Right-click a shopkeeper and speak to them to open the trading screen.
Then right-click the items you want to sell.
I Got Attacked and Knocked Out While Mining!!
In most cases, as long as you keep the game running at four-times speed, either your protagonist or Ruka will eventually regain consciousness.
Once someone gets up, right-click the injured character and use a First Aid Kit to prevent their wounds from worsening.
Do not leave them untreated for too long, or they may die.
You can also drag and drop items from a character’s inventory onto another character’s portrait at the bottom of the screen.
Use this method if the unconscious character was the one carrying the First Aid Kits.
After treating the injured character, have the conscious character right-click them and pick them up.
Then carry them to the second floor of one of the bars.
Once you reach a bed, right-click it and pay the fee to place the injured character in it.
As long as their wounds have been treated, characters recover from injuries extremely quickly while sleeping in a bed.
I Don’t Want to Get Attacked in the First Place!!
Reduce the game speed to around two-times speed while mining.
When Hungry Bandits approach, send every member of your party running toward the town gate.
The guards will deal with the bandits for you.
That said, getting beaten up by Hungry Bandits is one of the standard ways to train characters in Kenshi.
You will grow stronger much faster if you stop being afraid of losing fights.
Step 4: Obtain Enough Food, First Aid Kits, and Weapons
Continue earning money through mining while gradually purchasing the essential supplies you need.
A good initial guideline is:
- Food: One item per person. The nu value indicates its nutritional value, or how much hunger it restores.
- First Aid Kits: Two per person.
- Weapons: Replace the iron club as soon as possible.
One piece of food per character is enough.
The Hungry Bandits around Squin will steal food from you, so carrying a large stockpile around will merely give them more to take.
If you are mining near town, two First Aid Kits per person should be more than enough to handle most situations.
To buy something, right-click a shopkeeper and speak to them, just as you would when selling items.
Then right-click an item in the shopkeeper’s inventory to purchase it.
You should replace your protagonist’s iron club as soon as possible.
Not only is it one of the weakest weapons in the entire game, but blunt weapons as a category also have questionable long-term potential.
Step 5: Recruit Two More Companions from the Bars in Squin and Stack
Once you have saved either 3,000c or 6,000c, gradually recruit two additional companions from the bars in Squin and Stack, the town to the north.
**Caution!!!**
When you go to Stack, you MUST go there by male Greenlander or Scorchlander.
If not, Ruka are arrested!!!
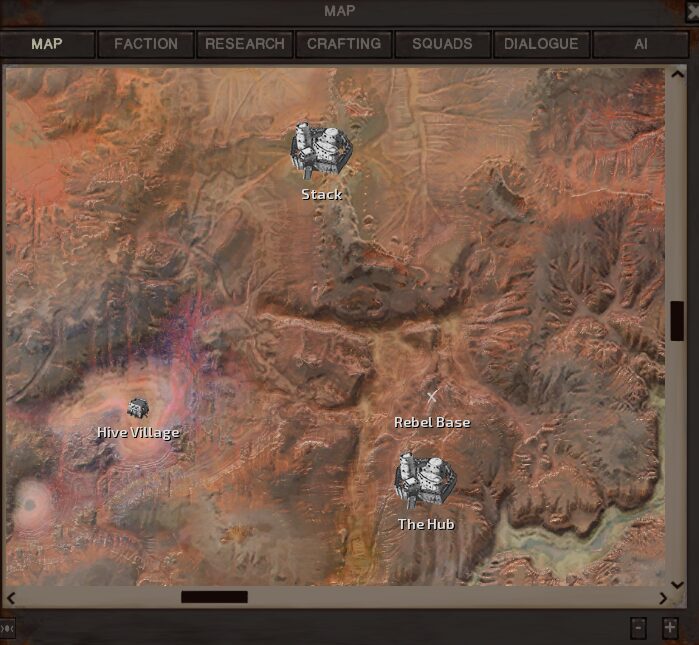
In Squin, you can recruit Shek companions.
In Stack, you can recruit Greenlanders and unique NPCs such as Griffin.
Shek recruits excel in combat, while Greenlanders are better suited to technological research.
As for the Greenlander bonuses to farming and laboring… I personally did not feel that they made much of a difference.
Choose whichever races you like.
When in doubt, I recommend recruiting one Shek and one Greenlander.
This combination gives you a good balance of combat power and research ability.
Your mining speed will also increase, and your party will have a better chance of surviving an attack.
You can assign multiple characters to a single resource deposit to increase mining speed.
However, each deposit has a limit on how many characters can work it at the same time, so keep that in mind.
For information on what equipment to give your new recruits, refer back to Step 4.
Reference: Recommended Weapon Types for Each Race
Shek
Heavy weapons and hackers are recommended because they benefit from the Shek’s increased Strength growth.
However, you should probably avoid the Fragment Axe.
It is so absurdly heavy that even Shek characters may swing it painfully slowly and fail to deal meaningful damage.
Greenlander
Anything other than katanas and blunt weapons will work.
They are flexible enough to function with almost any hand-me-down weapon you give them.
Scorchlander
Sabres and polearms are recommended.
Scorchlanders receive a penalty to Strength growth, so they are less suited to weapons such as hackers and heavy weapons, which rely heavily on Strength when calculating damage.
Hive
Sabres and polearms are recommended.
Since Hivers also suffer penalties to Strength growth, the same general advice given for Scorchlanders applies to them.
Regardless of race, if you are choosing a weapon based on long-term potential, you should probably avoid both blunt weapons and katanas.
Blunt weapons simply deal relatively low damage.
Katanas suffer heavily against armor because of the way their damage is calculated, effectively receiving two separate disadvantages against armored enemies.
As a result, they struggle to damage powerful opponents, since powerful enemies tend to wear heavy armor.
I recommend using these weapon types only when you specifically want to role-play a non-lethal fighter or a wandering swordsman.
Step 6: Buy a House in Squin
Once you have saved 7,200c, buy a house in Squin.
At this point in the game, owning a house provides the following advantages:
- Your characters can automatically carry mined copper and iron into storage containers, provided you build dedicated copper and iron storage.
- If you place food inside a Food Store, hungry characters will automatically retrieve and eat it.
- You can complete research and unlock facilities in advance, preparing yourself for the construction of an independent outpost later.
- With enough time, armor crafting allows you to produce some of the strongest equipment in the game. You can also accumulate a tremendous fortune during the process.
- Your characters will repeatedly walk around while carrying heavy items, allowing them to rapidly train both Strength and Athletics.
Furthermore, losing a battle around Squin will not result in your characters being enslaved or eaten alive.
The main things you cannot easily purchase in town are crossbows and light armor.
Crossbows are fairly difficult to use during the early game, while light armor can be crafted inside your own house.
As a result, these disadvantages barely matter for a very early-game base.
Buying a house in Squin provides a huge number of advantages with relatively few drawbacks.
It is an excellent place to prepare for your eventual departure into the wider world.
To buy a house, left-click one of the ruined buildings in town.
Then left-click the price displayed in the lower-left corner of the screen.
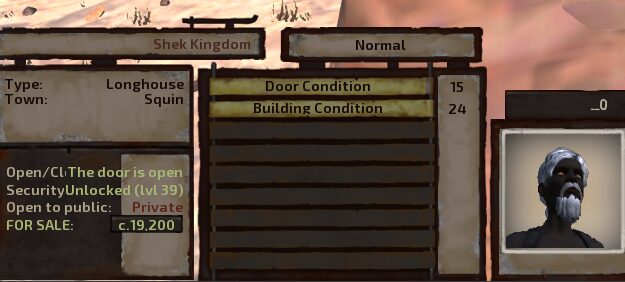
The building will be in terrible condition immediately after you purchase it.
Buy Building Materials from a general store—the shop with the scales sign—then right-click the building and order your character to repair it.
Your character will begin the repair work.
If the character stops working despite still carrying Building Materials, right-click the building and issue the repair command again.
Step 7: Research and Build Storage Containers
You are almost there!!
Use the Build button to construct a Research Bench inside your house, then begin researching new technologies.
Building a Research Bench requires three Building Materials.
While one character handles the research, have the remaining party members continue earning money through mining, just as they did during the previous steps.
Your First Research Project: “Item Storage” Under “Core”
After constructing your Research Bench, you will first need some Books, which can be purchased from a general store.
Right-click the Research Bench and select Inventory.
Place the Books inside the bench.
You can now consume the Books as a resource to complete research projects.
Open the technology menu from the command panel in the lower-right corner of the screen and select the technology you want to research.
For your first project, I recommend researching Item Storage under the Core category.
Once you have selected the project, choose the character who will handle the research.
A character other than a Shek is recommended, since Shek characters receive a penalty to Science experience gain.
Right-click the Research Bench and order the character to begin researching.
After a while, the research will be completed, unlocking various storage containers.
Build a Food Store inside your house and place food inside it.
Your mining characters will then automatically return to the house and eat whenever they become hungry.
Be careful: General Storage Boxes and General Storage Chests do not have the automation functions required for this system!!
Use those two container types purely as places to manually store miscellaneous items.
Your Second Research Project: “Storage Boxes” Under “Industry”
Next, open the technology menu again and research Storage Boxes under the Industry category.
This will unlock storage containers for iron and copper.
Once you build these containers, characters assigned to mining jobs will automatically carry the ore they mine into the appropriate storage.
What to Do When Items Disappear from Your Inventory Immediately After You Take Them Out of Storage
When this happens, check whether the character still has a copper- or iron-mining job assigned.
If they do, the character is probably following their job instructions and immediately returning the item you removed to its storage container.
To prevent this, temporarily turn off the character’s Jobs setting while removing and transporting the items.
Step 8: What to Do Next
Congratulations!!
By this point, you should have established a basic living and economic foundation.
You have probably also developed a rough understanding of the game’s controls and systems.
Here are a few general directions you can take from this point onward:
- Continue researching until you unlock armor crafting, then begin improving your equipment.
- Research technologies in the Core, Farming, Power, and Defense categories to prepare for building your own independent outpost in the wilderness.
- Carry large quantities of iron around town while remaining in stealth mode to train both Strength and Stealth.
- Complete your preparations and set out on a journey across the world.
Make full use of the foundation you have built and enjoy everything the world of Kenshi has to offer.
Enjoy your gaming life!!
Thank you so much for reading to the end!!