This post is also available in:
Last time, I made use of Grim Tools to collect Devotion Shrines and finally cleared the main campaign on Elite difficulty.
My character was starting to come together in terms of power, but there was one problem: the visual effects were getting so intense that I was seriously starting to wonder whether I could keep playing the build.
So this time, I’m going to rebuild the character into a Physical Cadence Warder and head into the Fangs of Asterkarn (FoA) expansion area.
- What Is Cadence?
- Optimizing the Devotion Route for a Cadence Warder
- Which Constellations Are Good for a Physical Warder?
- The Devotion Route I Actually Used
- Skill Point Priority for the Cadence Tree
- Easy-to-Obtain Gear for a Cadence Warder
- Using the Ascension Altar to Raise Faction Reputation
- Changing Settings to Make Farming More Efficient
- Progressing Through the FoA Main Quest... Only to Lose to the Final Boss
- Taking on the Shattered Realm on Ultimate
- Farming the Shattered Realm on Elite and Fine-Tuning My Gear
- Picking Up Quests That Award Attribute and Skill Points
- Finishing My Leveling and Taking Revenge on the FoA Final Boss on Elite
What Is Cadence?
Cadence is a skill where two out of every three attacks are normal attacks, while every third attack unleashes a much more powerful strike.
During those normal attacks, you have opportunities to trigger skills generally referred to as WPS (Weapon Pool Skills). Even investing just a small number of points into WPS skills makes it much easier to deal decent damage on the attacks where Cadence itself does not trigger.
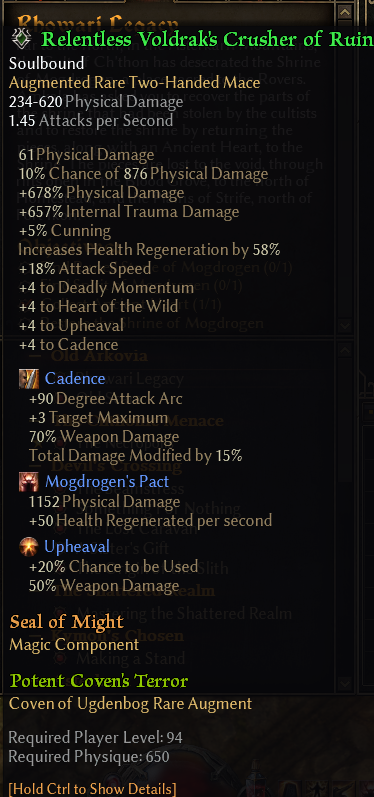
Cadence itself normally only hits a single target, but by investing in its modifier Fighting Form, or equipping Voldrak’s Crusher, which I’ll discuss later, you can turn it into a powerful multi-target attack.
The skill’s visual effects are also hilariously understated.
And for my poor eyeballs, that might honestly be its biggest selling point.
Optimizing the Devotion Route for a Cadence Warder
To rebuild into a Physical Warder, the first thing I needed to do was reset my Devotion setup.
You can remove individual Devotion points by talking to a Spirit Guide in town, but when you’re resetting almost your entire constellation setup like I was, that ends up costing a huge number of Aether Crystals.
Instead, I decided to use a Tonic of Clarity, which can be obtained from various quest rewards, and reset all of my spent Devotion points in one go.
Which Constellations Are Good for a Physical Warder?
So, what constellations are actually good for a Warder focused on Physical damage?
First, let’s look at what a Warder is naturally good at:
- Attacking with two-handed weapons
- Becoming extremely tanky through massive Health and Health Regeneration
With that in mind, my basic approach was to first pick constellations that amplify those strengths, then grab useful Physical-damage constellations that fit naturally along the route.
Here are some of the most notable options.
Kraken
This constellation massively improves both offense and survivability while using a two-handed weapon.
Looking through community build guides, Kraken is basically an automatic pick for any two-handed build, whether you’re using a melee or ranged weapon.
It’s that much of a staple.
Behemoth / Harvestman’s Scythe / Tree of Life
All three of these constellations provide bonuses to maximum Health and Health Regeneration.
The Warder already has some of the highest Physique around, second only to the Warlord, while also having access to both flat bonuses and percentage multipliers for maximum Health and Health Regeneration.
In other words, the class has enormous potential to become an absolute Health monster.
Taking all three of these constellations would be difficult with the number of Devotion points available, so this time I went with Behemoth and Tree of Life, partly because their Celestial Powers also provide immediate healing.
Assassin’s Blade
Not only does this constellation provide bonuses to Physical damage, its Celestial Power is incredibly powerful because it greatly reduces the Physical and Pierce Resistance of enemies you critically hit.
The difference in damage output depending on whether this effect is active is absolutely enormous.
So this one gets high priority.
Azrakaa, the Eternal Sands
Azrakaa provides a large damage bonus to Physical attacks, and its Celestial Power, Shifting Sands, also deals Physical damage with a weapon damage component.
The individual hits aren’t especially powerful, but the skill has an extremely short 0.5-second recharge.
If you assign it to something like Wind Devil, which gives the skill plenty of chances to trigger, Shifting Sands will keep firing off again and again.
And because it contains a weapon damage component, Attack Damage Converted to Health (ADCtH) works with it too.
So you’ve basically got a constellation that automatically attacks enemies while also helping restore your Health.
Talk about utility.
The Devotion Route I Actually Used
After resetting my Devotions with a Tonic of Clarity, I took the constellations in the following order:
- Blue Crossroads
- Eel
- Lizard
- Sailor’s Guide
- Purple Crossroads
- Hammer
- Empty Throne
- Yellow Crossroads
- Lotus
- Assassin’s Blade
- Solemn Watcher
- Scholar’s Light
- Kraken
- Red Crossroads
- Behemoth
- Remove Scholar’s Light at a Spirit Guide
- Tree of Life
- Remove Blue Crossroads
- Remove Purple Crossroads
- Remove Red Crossroads
- Azrakaa, the Eternal Sands
With this setup, I can boost maximum Health, Health Regeneration, and Physical damage all at once.
Skill Point Priority for the Cadence Tree
Respeccing the skill points is actually pretty straightforward.
I simply took the points that had previously gone into the Primal Strike tree and Raging Tempest, then redistributed them into Cadence, its modifiers Fighting Form and Deadly Momentum, and several WPS skills.
My priority went like this:
- Get Fighting Form to level 6 including bonuses from equipment, since that’s a breakpoint where the number of targets increases.
- Put one point into Deadly Momentum and each WPS, then rely on bonuses from gear to raise them further.
- Dump most of the remaining points straight into Cadence itself.
- Split whatever is left roughly evenly between Fighting Form and Deadly Momentum.
This gave me a nice balance between the convenience of multi-target attacks and raw damage.
The four WPS skills I’m referring to here are:
- Markovian’s Advantage
- Zolhan’s Technique
- Feral Hunger
- Upheaval
Easy-to-Obtain Gear for a Cadence Warder
There is actually quite a lot of gear that’s easy to obtain and provides a substantial power increase for a Warder using Cadence.
Faction gear is especially convenient because you’re guaranteed to be able to buy it once your reputation is high enough.
Rare Monster Infrequent (MI) items, meanwhile, can be farmed from specific enemies and often have a high drop rate. There may technically be a chance for some of them not to drop, but in my own experience so far, the ones I’ve been farming have dropped every time.
Of all the gear listed below, the two pieces I consider especially important are:
- Voldrak’s Crusher, a two-handed weapon
- The Malmouth Resistance shoulder armor
These don’t just increase Cadence’s damage and the number of targets it can hit.
They also let Upheaval help cover your damage output between Cadence hits, while giving your Health Regeneration a serious boost on top of that.
I’d recommend making these two items your first major targets.
Voldrak’s Crusher is also very easy to farm, since Voldrak, the Destroyer, the boss of Smuggler’s Pass, has a very high chance of dropping it.
For survivability, Gollus’ Ring is extremely useful.
It drops from Gollus, the Deepdweller, who can be found in the secret Den of the Lost, accessed through the Skittering Den from the Royal Hive.
The ring boosts maximum Health and Health Regeneration while also providing +3 to Menhir’s Bulwark and +3 to Mogdrogen’s Pact, two skills that play a major role in keeping a Warder alive.
Once you’ve killed Gollus and obtained a ring, simply returning to the title screen and starting another session will respawn him, so farming two rings isn’t particularly difficult.
If you’d like to know more about how to search for items and figure out where to farm them, I covered the process in detail in:
【How to Use Grim Tools】Using the Item Database for Easier Target Farming
Check it out if you’re interested.
Weapons for a Cadence Warder
Voldrak’s Crusher
Provides:
- Physical damage bonuses
- Health Regeneration
- Attack Speed
- +4 to Deadly Momentum
- +4 to Upheaval
- +4 to Heart of the Wild
- Increased Cadence damage
- Increased number of targets hit by Cadence
- Increased Physical damage and Health Regeneration for Mogdrogen’s Pact
- Increased activation chance and damage for Upheaval
Head Gear for a Cadence Warder
Black Legion Faction Head Gear
- Increased maximum Health
- Defensive Ability
- Physical Resistance
- Aether Resistance
- Chaos Resistance
- Bleeding Resistance
Kymon’s Chosen Faction Head Gear
- Physical damage bonuses
- Offensive Ability
- Defensive Ability
- Pierce Resistance
- Chaos Resistance
Malmouth Resistance Faction Head Gear
- Physical damage bonuses
- Increased maximum Health
- Projectile Avoidance
- +2 to Zolhan’s Technique
- Pierce Resistance
- Aether Resistance
Barrowholm Faction Head Gear
- Physical damage bonuses
- Offensive Ability
- Defensive Ability
- Projectile Avoidance
- Elemental Resistance
- Bleeding Resistance
- +3 to Mogdrogen’s Pact
Chest Armor for a Cadence Warder
Devil’s Crossing Faction Chest Armor
- Offensive Ability
- Pierce Resistance
- Chaos Resistance
- +2 to Markovian’s Advantage
Cult of Dreeg Faction Chest Armor
- Bonus to all damage
- Offensive Ability
- Defensive Ability
- Vitality Resistance
- Aether Resistance
- Freeze Resistance
- +2 to Oak Skin
Shoulder Armor for a Cadence Warder
Malmouth Resistance Faction Shoulder Armor
- Physical damage bonuses
- Projectile Avoidance
- Aether Resistance
- Chaos Resistance
- +2 to Cadence
Gloves for a Cadence Warder
Homestead Faction Gloves
- Bonus to all damage
- Cunning
- Offensive Ability
- Pierce Resistance
- Vitality Resistance
Boots for a Cadence Warder
Black Legion Faction Boots
- Increased maximum Health
- Movement Speed
- Physical Resistance
- Aether Resistance
- Elemental Resistance
- Stun Resistance
Belts for a Cadence Warder
Devil’s Crossing Faction Belt
- +1 to all Soldier skills
- Physical damage bonus
Barrowholm Faction Belt
- +1 to all Soldier skills
- Offensive Ability
- Poison & Acid Resistance
- Vitality Resistance
Rings for a Cadence Warder
Gollus’ Ring
- Maximum Health
- Health Regeneration
- Pierce Resistance
- +3 to Mogdrogen’s Pact
- +3 to Menhir’s Bulwark
Using the Ascension Altar to Raise Faction Reputation
If you want to raise your faction reputation efficiently, the Ascension Altar, which becomes available after reaching Kurnhold in FoA, is extremely useful.
By spending just five Aether Crystals, you can increase your reputation gains to 2.25 times the normal amount.
Enemies do become stronger in exchange, but in my experience the increase wasn’t severe enough to make progression noticeably painful.
For more details, check out my separate article explaining how the Ascension Altar works.
When farming faction reputation, I recommend hunting in areas that require a Skeleton Key to enter—commonly referred to by the Grim Dawn community as roguelike dungeons.
Roguelike dungeons are packed with a specific type of enemy, along with large numbers of Hero monsters, making them an excellent place to farm reputation efficiently.
Here are some recommended roguelike dungeons:
- Steps of Torment — Almost exclusively populated by Undead, making it ideal for farming reputation with the Rovers.
- Bastion of Chaos — Filled with Chthonians, making it a great choice for The Outcast and Barrowholm.
- Ancient Grove — Mainly populated by Beast-type enemies, making it useful for Homestead and the Coven of Ugdenbog.
If you’re not sure where to find them, look them up on the Grim Dawn World Map and pay them a visit!
Changing Settings to Make Farming More Efficient
While we’re at it, let’s tweak a few settings to make farming more efficient.
Hiding Common and Magic Items with the Loot Filter
Common and Magic gear is generally too weak to be useful at this point, and even if you sell it, it’s barely worth anything.
All it really accomplishes is filling your inventory and forcing you to constantly travel back to town.
Honestly, you can stop picking these items up entirely without causing yourself much trouble either in terms of equipment or money.
So let’s go into the Loot Filter and hide both Common and Magic items.
Much less hassle.
Maximizing the Auto-Pickup Range for Components and Iron Bits
This setting isn’t in the main menu.
Instead, open the Options screen after pausing the game, and you can increase the automatic pickup range for Components and Iron Bits to the maximum.
There isn’t really any downside to increasing the range, so feel free to crank that sucker all the way up.
Progressing Through the FoA Main Quest… Only to Lose to the Final Boss
After sorting out my Devotions and equipment, I continued through the FoA main quest.
And then…
I got absolutely destroyed by the final boss.
This wasn’t even one of those long, drawn-out fights where I gradually lost a battle of attrition.
The boss hit me with a claw attack, followed it up with an explosion, and I just died instantly.
The difference in power was painfully obvious.
So I decided to put the rematch on hold, raise my faction reputation further, gain some more levels, make some progress through Ultimate difficulty, and then come back for revenge.
Taking on the Shattered Realm on Ultimate
While farming faction reputation on Elite, I eventually found myself approaching level 90.
Around this point, I started running short on the Spirit required to equip some rings, so I switched my attribute point allocation from Physique to Spirit whenever I leveled up.
I quickly cleared Act 1 on Ultimate and then tried the Shattered Realm several times.
Sometimes I could clear Shard 1 without much trouble.
Other times, enemies would exploit the gaping hole created by my miserable 48% Fire Resistance, and I’d turn into a pile of ash almost instantly.
In short:
It was wildly inconsistent.
Farming the Shattered Realm on Elite and Fine-Tuning My Gear
From here, I started repeatedly running the Shattered Realm on Elite while carefully evaluating my equipment.
I prioritized gear in roughly the following order:
- Bonuses to Cadence
- Health Regeneration and increased Health Regeneration
- Offensive Ability
- To reduce missed attacks
- And to score critical hits more reliably so Assassin’s Blade can reduce enemy Physical Resistance
- Armor and maximum Health
- Resistance to crowd-control effects
- Damage resistances
I put regular damage resistances at the bottom of the list because they’re relatively easy to patch up using Augments unlocked at Revered faction reputation and the various Components available throughout the game.
Once you reach level 90, every Augment and Component becomes available for use.
That makes level 90 a major turning point where suddenly it’s much easier to get all of your resistances into good shape.
Once my resistances were mostly covered through Augments and Components, I started stuffing any remaining equipment slots with options that increased Health Regeneration even further.
MORE TANKINESS.
Components can be recovered by using an Inventor, although you’ll have to sacrifice the item they’re attached to in the process.
Augments, on the other hand, are extremely cheap, so you can use them pretty casually without worrying too much.
Incidentally, when applying an Augment, the game displays a warning telling you that the equipment will become Soulbound.
What this means is:
You will no longer be able to transfer that item to another character through the shared stash.
If you weren’t planning on passing the item to another character anyway, there’s nothing to worry about.
So, with all that done, this is what my equipment looked like at this point.
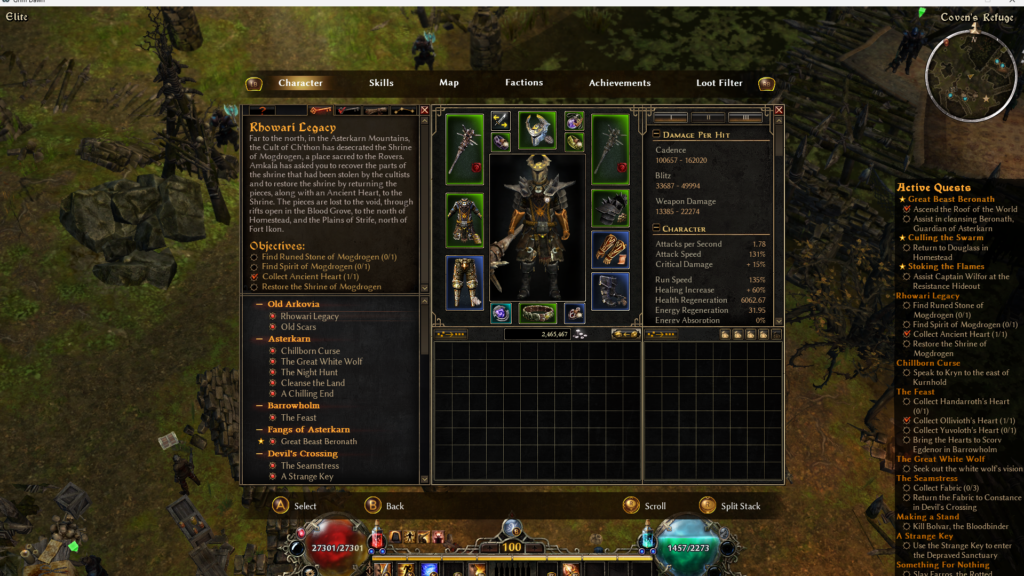
By going all-in on the build’s strengths, I managed to reach:
- 27,301 maximum Health
- 6,062 Health Regeneration per second
- 100,000–160,000 damage per Cadence hit
At this point, on Elite difficulty, I was regenerating Health significantly faster than most enemies could damage me.
I could basically stand there swinging away while watching my Health bar shoot straight back up every time something managed to hurt me.
Picking Up Quests That Award Attribute and Skill Points
There are three quests shared across Normal through Ultimate that reward Attribute or Skill Points:
- Kasparov’s Experiment
- A Merciful End
- The Hidden Path
There are also several additional point-rewarding quests exclusive to Ultimate difficulty.
So I went back and cleared these quests to grab the extra points.
While I was at it, I also trimmed away some unnecessary overcapped resistances and invested even further into maximum Health and Health Regeneration.
Finishing My Leveling and Taking Revenge on the FoA Final Boss on Elite
*Spoiler Warning*
Here’s what the character looked like in Grim Tools after all that leveling:
https://www.grimtools.com/calc/2pJ0lXyZ
Maximum Health had reached 29,521, while Health Regeneration was up to 6,712 per second.
My resistances were also looking much healthier:
- 15% Physical Resistance
- 80% in every other major resistance
- 10% ADCtH
And with that…
It was time for revenge against the final boss of FoA.
I spent more than ten minutes alternating between hitting the boss and running away.
Hit.
Run.
Hit.
Run.
Over and over and over.
And somehow…
I FINALLY KILLED IT.
Yeah.
If I’m going to kill this thing on Ultimate, I’m definitely going to have to treat gear farming like the proper endgame activity it is.
So next time, I’ll continue progressing through Ultimate difficulty and start putting together a proper endgame farming setup.
As a side note, I also took this build into the Shattered Realm on Ultimate difficulty.
Thanks to finally getting my resistances in order, I was able to clear up through Shard 10 pretty consistently. However, once I reached Shard 12, things started to fall apart whenever multiple damaging ground effects were layered on top of each other.
At that point, my health regeneration simply couldn’t keep up with the incoming damage, and I ended up dying quite often. It was a useful test, though, as it gave me a pretty clear idea of where the build’s current limit lies.
Until then, have a great gaming life!!
And as always, thank you very much for reading all the way to the end!!!
Previous Log:
Collecting Devotion Shrines and Clearing Elite [Warder from a Fresh Start #7]
Next Log:
Beating the Final Boss on Ultimate & Ascendant [Warder from a Fresh Start #9]