This post is also available in:
Welcome back to my series on raising a Warder from scratch in Grim Dawn, with no shared gear or other assets to rely on.
Last time, we completed several important early-game quests before moving on to Act 2.
This time, I’ll be focusing on strengthening the build—particularly by increasing our damage output and, in turn, improving the healing we receive through ADCtH to make our survivability more consistent.
- If you start missing attacks against bosses, increase your Offensive Ability.
- The Soldier skill Fighting Spirit greatly improves both your damage and your healing through ADCtH.
- Hunt the undead in the Arkovian Foothills to raise your reputation with the Rovers and purchase component blueprints from their faction vendor.
With that out of the way, let’s get started.
- Put One Point into Fighting Spirit
- Somehow, I Completed the Wildcaller Set
- Report “Clearing the Way” to Expand Your Inventory
- Unlock Squad Tactics and Blindside
- Invest in Skills While Monitoring Your Performance
- Hunt Undead to Unlock Rover Faction Items
- Struggling Against the Boss of the Arkovian Undercity
- After Defeating the Boss, Unlock the Broken Hills Rift Before Returning
- Next Time
Put One Point into Fighting Spirit
At level 1, Fighting Spirit has a 5% chance to activate when you take damage, granting the following self-buffs for five seconds:
- +35% to all damage
- +30 Offensive Ability
As you raise the skill level, both its bonuses and its chance to activate increase.
At its normal investment cap of level 12, it provides:
- 40% activation chance
- +200% to all damage
- +235 Offensive Ability
That makes it an extremely reliable and powerful buff.
For now, I decided to put just one point into it and see how it performed.
Somehow, I Completed the Wildcaller Set
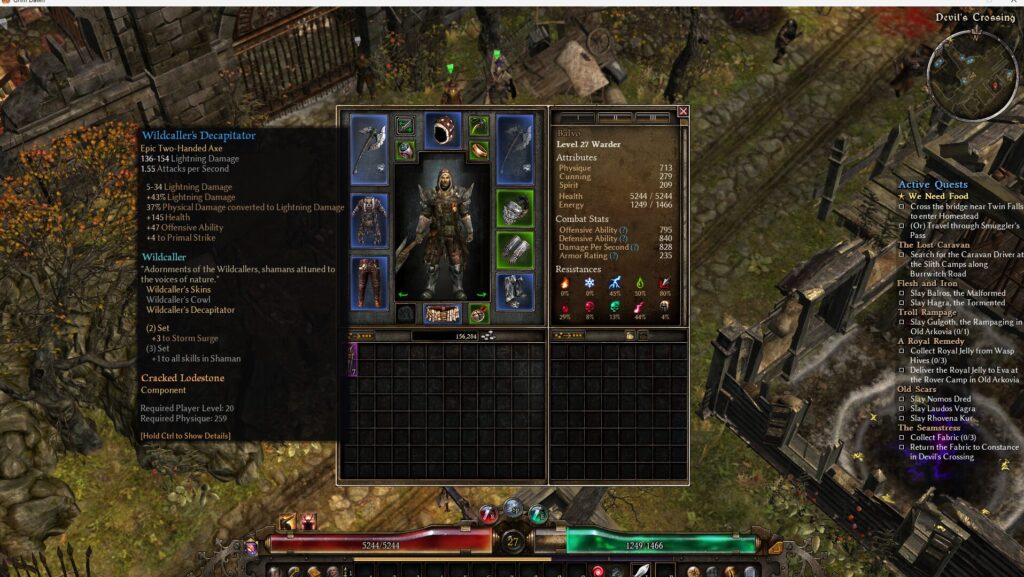
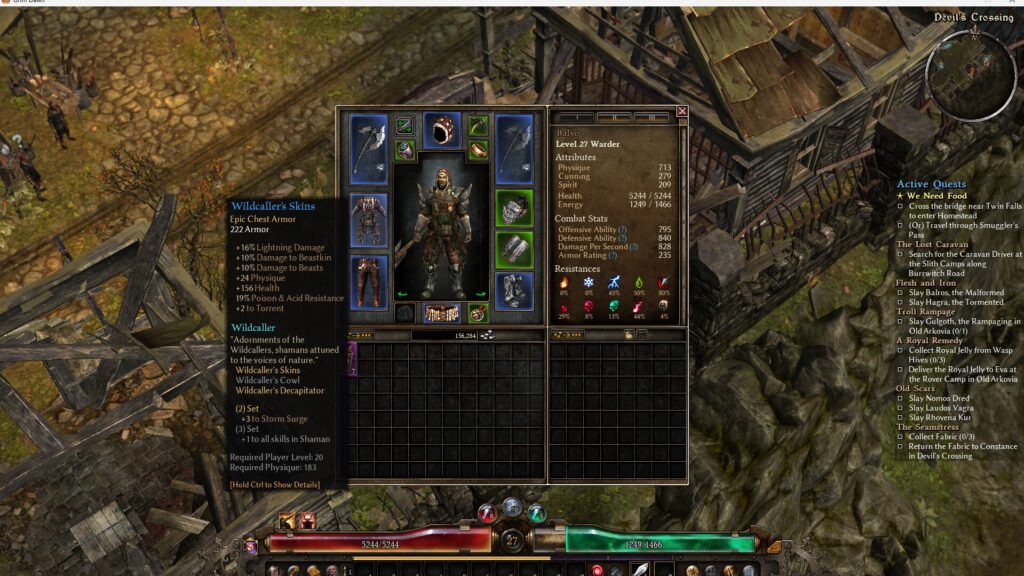
I have no idea why, but the loot gods were apparently smiling upon me, and I managed to obtain both pieces of the Wildcaller set.
The set provides bonuses to:
- Offensive Ability
- Lightning damage
- Physical damage converted to lightning damage
- Physique and health
In other words, it offers plenty of lightning-focused offensive bonuses alongside some extra survivability.
On top of that, it grants:
- +4 to Primal Strike
- +2 to Torrent
- +3 to Storm Surge as the two-piece set bonus
It could hardly be more perfectly suited to this build.
Naturally, I equipped both pieces and decided to get as much use out of them as possible.
Report “Clearing the Way” to Expand Your Inventory
Once you complete the Rover side quest “Clearing the Way,” in which you use dynamite to destroy a bandit barricade, return to Bernard at the Rover Camp as soon as reasonably possible.
Your reward includes an additional inventory bag.
You can still receive the reward even if you completed the objective before accepting or reporting the quest, so there’s no need to panic if you suddenly think:
“Wait, did I forget to talk to that guy?”
Unlock Squad Tactics and Blindside
Once you reach level 27, raise the Soldier mastery bar to 32 and unlock the following skills:
Squad Tactics
A passive skill that increases your damage and attack speed.
Blindside
Applies a Defensive Ability reduction debuff to enemies hit by Blitz, making it easier to land critical hits against them.
Invest in Skills While Monitoring Your Performance
Around this point in the game, you may begin to notice that your attacks are not dealing as much damage to Hero-class enemies.
At the same time, enemy attacks start removing larger chunks of your health, making damage races increasingly uncomfortable.
When this happens, take a moment to observe exactly what kind of situation is giving you trouble.
During my playthrough, I noticed the following problems:
- I was missing noticeably more attacks against bosses.
- Individual boss attacks were dealing a lot of damage.
- Because my attacks were missing, ADCtH was not functioning consistently, and my health kept dropping.
Based on those observations, I decided to invest further in Fighting Spirit and Field Command to increase my Offensive Ability and armor.
It is also worth briefly explaining how armor works in this game.
Most enemy attacks in Grim Dawn deal a mixture of physical damage and one or more additional damage types. Even attacks that look like pure elemental spells—such as fireballs—often contain close to 30% physical damage.
As a result, increasing your armor can reduce the damage you take from almost every kind of enemy attack.
Here is what happened when I challenged a boss after investing in the skills mentioned above.
Pay particular attention to the icons displayed above my health bar. This is where you can see which temporary buffs are currently active.
As you can see, while Fighting Spirit—the icon showing a raised fist—is active, the enemy’s health decreases more quickly, while my own health falls much more slowly.
This is probably because the combination of increased Offensive Ability and increased total damage allows me to deal damage more consistently while also stabilizing the healing provided by ADCtH.
In other words, increasing your damage can actually make the build more stable, because it also increases the amount of health you can recover.
Hunt Undead to Unlock Rover Faction Items
Defeating undead enemies around Old Arkovia raises your reputation with the Rovers.
The Arkovian Undercity, which you will pass through as part of the main story, is populated almost entirely by undead enemies. This makes it an excellent place to build Rover reputation.
Once your reputation is high enough, you will be able to purchase the blueprints for Restless Remains and Mark of Mogdrogen from the faction vendor.
The ADCtH granted by attaching Restless Remains to hand armor is one of the most useful component effects in the entire game.
Meanwhile, the movement-speed bonus from Mark of Mogdrogen is extremely helpful for improving your overall farming efficiency.
Both components require a reasonable amount of crafting materials, so I recommend recovering them at the Inventor whenever you replace the equipment they are attached to. You can then attach them to your new gear instead.
Unless the item is already close to being part of your final equipment setup, there is usually no need to worry too much about destroying the old piece of gear during component recovery.
Struggling Against the Boss of the Arkovian Undercity
“I suppose I’ll start raising the Shaman mastery bar from here and work toward Wendigo Totem and Blood Pact for more healing…”
That was the plan.
Then I ran into a problem.
I had an unexpectedly difficult time against the boss of the Arkovian Undercity.
I did not have enough damage, and I did not have enough survivability either.
Even if I took the shortest possible route toward Blood Pact, I would still need another five levels to unlock it. That meant I could expect to struggle for quite a while before the build came properly online.
So, next time, I’m going to do a little damage calculation and reconsider which skills deserve my points.
After Defeating the Boss, Unlock the Broken Hills Rift Before Returning
After leaving the Arkovian Undercity, head a short distance south to find the Broken Hills Rift.
If you forget to unlock it, you will have to travel through the same area again later.
Make sure you activate the Rift before returning to town.
Next Time
And with that, we have made it through the Arkovian Undercity.
The build clearly needs some additional offensive power, so next time I’d like to sit down and do a little damage calculation.
Finally, here is the Grim Tools link for the current version of the build:
https://www.grimtools.com/calc/ZP4zO0gZ
Until next time, enjoy your gaming life!
Thank you so much for reading all the way to the end!