This post is also available in:
Now that I’ve defeated the superboss in Dungeon Antiqua2, I figured I’d put together everything I’ve learned about the game’s classes and skills: how they work, tests of their in-game behavior, and how they actually feel to use from the very beginning all the way into the endgame.
How Classes Work
- The class you choose when creating a character gives a +1 bonus to one stat.
- There does not appear to be any difference in the amount of EXP required by different classes.
- You can freely change classes at the Training Center, with no penalty or resource cost whatsoever.
How Skills Work
- Base Skills are skills that a class always has.
- Sub Skills are skills that can be freely equipped in up to three Sub Skill slots.
- You earn Skill points at the end of battle.
- Skill points accumulate for your current class, and Sub Skills are unlocked once you reach certain thresholds.
- Unlocking skills is automatic; you do not manually allocate Skill points.
- Once learned, Sub Skills remain available even after changing to another class.
- Mastering all of a class’s skills grants stat bonuses based on that class.
- Stat bonuses from different mastered classes stack.
How Gender Works
- Gender changes both starting stats and final stat caps.
- Male: Strength +2, Vitality +2
- Female: Agility +2, Wisdom +2, Piety +1
- Male characters can equip TYRFING, the strongest Sword, while female characters can equip GOLD HAIRPIN, which provides resistance to Sleep, Confuse, and Silence.
- There does not appear to be any way to change a character’s gender later.
How Stats Work
- Stats generally do not increase through leveling. They increase primarily by mastering classes.
- Strength increases physical attack damage.
- Agility affects turn order, accuracy, and evasion. (There may be some internal concept of “number of hits”; as Agility raises accuracy, damage also seems to increase along with it.)
- Higher Vitality reduces incoming damage and increases maximum HP. For reference, on a Fighter who had mastered every class: Vitality 17 = 892 HP, Vitality 18 = 985 HP, Vitality 19 = 997 HP.
- Wisdom and Piety…
honestly, I couldn’t really tell what difference they were making while playing.I received some helpful information from Dungeon Antiqua 2 developer frenchbread: Wisdom affects maximum MP and the power of Spell M, while Piety affects resistance and the power of Spell P.Thank you very much for the clarification!!…And apparently this was already mentioned in the in-game Help menu. I was so busy looking ahead that I completely missed what was right under my nose.
Fighter
With access to a wide variety of weapons and armor, plus naturally solid stats for straightforward physical combat, the Fighter provides reliable combat performance.
At the absolute beginning of the game, its damage and durability can look inferior to the Monk’s. Once you get past that stage, however, the Fighter settles into a very dependable role.
Its combat performance depends heavily on whether you can get hold of a weapon well suited to Two-Handed.
As a class to pass through while developing a character, Fighter is excellent thanks to the automatic status recovery from Inner Steel and its Strength bonus upon mastery.
Inner Steel is good enough to remain a first-string skill both during the main campaign and in endgame content, while Fighter also grants the largest Strength mastery bonus of any class.
And because even magic-oriented classes often make physical attacks to conserve MP or level efficiently in this game, Fighter has extremely high value as a class to train through.
Starting class bonus: Strength +1
Mastery bonus: Strength +3, Vitality +1
Equipment: Knife, Sword, Bow, Shield, Light gear, Heavy gear
Base Skill
Two-Handed
When a Sword, Katana, Wand, or Rod is equipped in the right hand and the left hand is empty, Attack Power increases by 50%.
At the very beginning of the game, displayed Attack Power is almost the same thing as actual damage, so you can basically think of this as a 1.5× damage skill.
It remains extremely useful for increasing damage later on as well.
(In fact, there are hardly any other passive skills in this game that directly increase displayed Attack Power, so characters using one-handed weapons tend to end up with fairly similar Attack Power.)
Sub Skills
Slash
A powerful attack using a Knife, Sword, or Katana. Lowers action priority and evasion.
Required Skill points: 25
Damage varies quite a bit, but it generally feels like an increase of around 20–30%.
As we’ll see in the test below, the estimated damage multiplier was 1.290×.
Perhaps because the Skill point requirement is so low, the damage increase is relatively modest for something that consumes one of your precious Sub Skill slots.
Its action priority is so low that you’ll usually act near the very end of the turn, which makes it awkward: an enemy you were about to finish off may get one last hit in before you do.
The evasion penalty is less troublesome. Unless you’re already at the point where your endgame base stats let you casually dodge everything anyway, I didn’t find the reduction large enough to dramatically change combat performance.
*Test*How Much Does Slash Increase Damage?
Under the following conditions, I performed 30 normal attacks and 30 Slash attacks against Goblins in the Tower of Trials.
Class: Fighter. Starting class: Fighter. All classes mastered. Male. Level 99.
Equipment: TYRFING held Two-Handed, ELVEN LEATHER, BRAGI’S HELM, ANCIENT GLOVES.
Skills: Slash, Decoy3, Qi Arts.
Normal attack damage
373, 363, 324, 376, 424, 357, 361, 333, 333, 360, 333, 312, 355, 367, 303, 354, 312, 317, 352, 390, 398, 332, 398, 336, 309, 314, 397, 303, 329, 309
Sample size n: 30
Mean: 347.467
Sample variance: 1077.085
Slash damage
461, 415, 433, 376, 495, 442, 510, 409, 397, 440, 388, 430, 459, 452, 473, 446, 513, 436, 502, 440, 495, 491, 446, 431, 443, 508, 397, 462, 428, 437
Sample size n: 30
Mean: 448.500
Sample variance: 1388.534
Let’s run a two-sided Welch’s t-test at a significance level of p < 0.05.
| Normal Attack | Slash | |
|---|---|---|
| Sample size | 30 | 30 |
| Mean | 347.467 | 448.500 |
| Sample variance | 1077.085 | 1388.534 |
| Standard deviation | 32.819 | 37.263 |
Welch’s t-test gives:
t = -11.145
df ≈ 57.09
p = 5.97 × 10⁻¹⁶
95% CI for the mean damage increase (Slash − Normal Attack): +82.88 to +119.19
The result is statistically significant at p < 0.05, and the 95% confidence interval for the difference does not include 0.
So at the very least, the data provide very strong evidence that Slash really does increase damage.
Estimating the Slash damage multiplier
Suppose Slash works by multiplying normal attack damage by some coefficient n.
Then:
448.500 / 347.467 = 1.29077
So, based on this sample:
- Slash significantly increases damage.
- The damage multiplier appears to be roughly 1.29×.
Two-Handed
Same as the Base Skill.
Required Skill points: 50
Eq Swords
Allows the character to equip Knives and Swords.
Required Skill points: 250
This lets magic classes and Thieves swing a Sword around to conserve MP.
It can also be handy while rotating through classes for character development.
That said, it mostly feels like a bridge until you learn things like the Monk’s Barehanded, which needs no weapon at all, or the Archer’s Bow Mastery, which lets you deal absurd damage safely from the back row.
Inner Steel
Immediately recovers from all status ailments at the end of the turn and increases Attack Power by 50% while near death.
Required Skill points: 600
This is one of the big reasons to train Fighter.
Its versatility is ridiculous: it works against every status ailment except instant Death.
It even shrugs off debuffs such as SLOW and ARMOR BREAK.
During the early game, when both MP and money are scarce, simply being able to automatically recover from Poison improves your ability to stay out exploring. Later on, it is also an excellent fallback when RNG refuses to give you the resistance gear you need.
It’s so convenient that from the midgame onward, every single member of my party had this skill.
That’s how hard it is to give up once you get used to it.
Monk
A walking ball of muscle that pulverizes everything with its bare hands.
Its biggest strengths are the incredible stability it provides during the dirt-poor opening hours and the torrent of damage it can unleash toward the endgame. During those periods, it can produce some of the highest physical damage in the game.
Its Vitality also happens to be the highest of any class, which makes it hilariously tough in the early game—most attacks barely manage single-digit damage.
Its low Defense does start to show from the midgame onward, so incoming damage increases. Even so, between the status resistances available on Dogi equipment, an HP pool that exceeds the Fighter’s, and the ability to kill enemies before they can attack thanks to its speed, the Monk occupies this weird niche where it dies far less often than the raw damage numbers would make you expect.
Its mastery bonuses are essentially the Fighter’s Strength and Vitality bonuses reversed.
That makes Monk extremely useful for beefing up the baseline durability of magic classes.
Better yet, once you master it and obtain Barehanded, a character can deal perfectly respectable damage with no weapon and no MP cost.
That means a Mage or Priest can effectively say:
“Cool, I’ll patch up my defenses… and then punch things to death for free whenever I want to save MP.”
It dramatically improves the usability of magic-focused characters.
Starting class bonus: Vitality +1
Mastery bonus: Strength +1, Vitality +3
Equipment: Dogi
Base Skill
Barehanded
Increases bare-handed Attack Power and allows any character to equip Dogi-category armor.
The game doesn’t mention this, but if you are not using a Shield, your normal attack becomes a two-hit attack.
From playing around with it, the damage seems to scale with Level and Strength.
With the two-hit attack, I’d rate its damage as top-tier in the early game and endgame, roughly competitive with other strong options in the later game, and somewhat weaker during the middle portion.
If you manage to pull POWER KNUCKLE from a random chest later in the game, though?
That’s when the bare-handed rampage begins.
The fact that you need no weapon is especially fantastic early on, when your equipment pool is still terrible.
It also helps enormously when rotating characters through different classes to collect skills. You can basically ignore the usual drop in combat performance caused by not having enough good weapons to pass around, which speeds up character development considerably.
Dogi armor tends to have lower Defense, but many pieces compensate with excellent resistances—HACHIMAKI, for example, completely prevents Sleep.
As a result, its practical survivability is much higher than the raw Defense number suggests.
Sub Skills
Qi Arts
Restores HP every turn during battle.
Required Skill points: 75
The recovery amount is tiny—only a low single-digit percentage of maximum HP—so it barely matters early on.
It really comes into its own toward the endgame, when you’re working toward mastering every class.
By then, maximum HP is much higher and you’re frequently deleting enemies in one hit anyway, so you can basically switch your brain off, slaughter everything in sight, and let the automatic regeneration clean up the chip damage.
*How Much HP Does Qi Arts Restore?*
Under the following conditions, I fought random trash mobs in the Tower of Trials and recorded the HP recovered by Qi Arts.
Class: Fighter. Starting class: Fighter. All classes mastered. Male. Level 99.
Equipment: TYRFING held Two-Handed, ELVEN LEATHER, BRAGI’S HELM, ANCIENT GLOVES.
Skills: Slash, Decoy3, Qi Arts.
Maximum HP: 997. Vitality: 19.
Qi Arts healing values
32, 32, 32, 32, 32, 32, 32, 32, 32, 32, 32, 32, 32, 32, 32, 32, 32, 32, 32, 32, 32, 32, 32, 32, 32, 32, 32, 32, 32, 32
Sample size n: 30
Mean: 32
Variance: 0
So in this setup, Qi Arts automatically restored only about:
32 / 997 = 3.209% of maximum HP per turn.
Power Hit
Occasionally deals double damage when attacking.
Required Skill points: 150
By feel, the activation rate seemed to be around 20%.
It doesn’t trigger often enough to rely on, but at the same time it feels like enough potential damage that not spending a skill slot on it can feel like leaving value on the table.
※Test※ Power Hit Activation Rate
Class: Fighter. Starting class: Fighter. All classes mastered. Male. Level 99.
Equipment: TYRFING, ANCIENT ARMOR, BRAGI’S HELM, ANCIENT GLOVES.
Skills: Qi Arts, Power Hit, Spell M5.
I performed 100 normal attacks against trash mobs in the Tower of Trials.
(As discussed later, it is possible that a Monk can kill the target before the Power Hit check on its second strike is ever reached, so I used the Fighter’s single-hit normal attack for this test.)
Power Hit activated 14 times.
Therefore:
14 / 100 = 0.14
The observed Power Hit activation rate in this sample was 14%.
Retaliate
Occasionally counterattacks after being attacked by an enemy.
Required Skill points: 200
This one also felt like roughly a 20% activation rate.
It is useful in the late game when you’re aiming for the glorious strategy of “hold the button down and level up without thinking.”
It simply speeds the whole process up.
Interestingly, when a Paladin’s Cover activates, the character performing the Cover can sometimes counterattack as well.
That makes it a very natural fit for a strategy where your Paladin tanks enemy attacks while chipping away at them with counters.
※Test※ Retaliate Activation Rate
Class: Monk. Starting class: Fighter. All classes mastered. Male. Level 99.
Equipment: Bare hand, Bare hand, ROBE of EVASION, BLACK COWL, MIRACLE RING.
Skills: Retaliate, Decoy3, Qi Arts.
I let trash mobs in the Tower of Trials attack me 100 times and counted the number of counterattacks.
Retaliate activated 24 times.
Therefore:
24 / 100 = 0.24
The observed activation rate was 24%.
Barehanded
Same as the Base Skill.
Required Skill points: 420
Priest
Your standard healer…
…except not really.
Priest gets PROTECTION and BARRIER, defensive buffs that can drastically change the difficulty of a fight. Enemies that rely on spells can be shut down with SILENCE, while PUNISH delivers some of the most consistently powerful single-target damage available against tough bosses.
It’s an absurdly versatile class.
RETURN, which lets you go back to town whenever you want, is so essential that playing without it practically feels like a challenge run.
Priest can also equip a good range of armor and a respectable number of weapons, so it isn’t completely helpless in melee either.
And because more healing is rarely a bad thing—and because quite a few bosses can strip buffs, making a second buffer far from redundant—simply having characters train as Priest so that they can use Priest spells later is useful by itself.
One important point: spells in this game must be purchased at the Spellbook Shop.
Leveling up alone does not teach them.
Starting class bonus: Piety +1
Mastery bonus: Piety +3
Equipment: Magic gear, Light gear
Base Skill
Spell P5
Allows the use of all Priest spells.
As long as you have the money, you can purchase every spell from Spell P1 through Spell P4 at the Spellbook Shop.
Spell purchases are shared across the entire party rather than tracked separately for each character.
You do not have to buy the same spell individually for everyone.
Spell P5 itself is unlocked after defeating Frau, the boss of Blazewave Cave.
Sub Skills
Spell P1~P5
Allows the use of Priest spells.
Required Skill points, from P1 to P5: 20, 60, 120, 220, 400
After changing away from Priest, a character can only cast spells up to the highest Spell P level they have learned.
Example:
If a character knows Spell P3, they can use spells categorized under Spell P1, Spell P2, and Spell P3.
They cannot use Spell P4 or Spell P5 spells.
Pray
Restores the user’s MP.
Required Skill points: 480
I managed to make it all the way through the superboss without using this even once, so I honestly had no idea how good it was in practice.
※Test※ How Much MP Does Pray Restore?
Class: Priest. Starting class: Fighter. All classes mastered. Male. Level 99.
Equipment: ROD of REVIVING, ROBE of EVASION, SNAKE CAP, MIRACLE RING.
Skills: Pray, Decoy3, Qi Arts. Maximum MP: 214. Piety: 18.
I used Pray 100 times in the Tower of Trials.
The recovery values were:
29, 21, 29, 24, 20, 21, 20, 22, 28, 23, 26, 27, 28, 22, 28, 27, 25, 23, 23, 25, 23, 29, 28, 27, 26, 28, 24, 24, 20, 21, 24, 20, 24, 20, 23, 27, 28, 23, 28, 23, 28, 28, 27, 25, 29, 21, 24, 21, 25, 24, 24, 20, 21, 21, 22, 23, 20, 28, 23, 22, 22, 27, 29, 28, 24, 25, 28, 22, 21, 26, 22, 22, 26, 23, 26, 25, 26, 22, 27, 24, 25, 22, 23, 21, 26, 20, 22, 21, 26, 22, 20, 21, 27, 28, 21, 20, 28, 20, 23, 27
Sample size n: 100
Mean: 24.15
Sample variance: 8.1894
Sample standard deviation: 2.8617
95% confidence interval for the mean: 23.58–24.72
The 95% confidence interval is quite narrow, so under these conditions, expecting roughly 24 MP per use at Level 99 seems reasonable.
That’s about the same recovery as a MANA DROP.
Mage Skills
The class that’s supposed to annihilate enemies with offensive magic…
…except I barely used offensive magic.
The reason is simple: this game’s main character-development loop revolves around fighting huge numbers of battles to earn Skill points.
In many situations, repeatedly using ordinary attacks is simply more efficient than burning finite resources on attack spells.
Fire-, Ice-, and Dark-element spells also run into another problem: even ordinary enemies frequently resist those elements, so there aren’t actually that many encounters where a single spell cleanly wipes the entire enemy formation.
And to make matters worse, the strongest single-target offensive spell isn’t even a Mage spell. It’s a Priest spell.
That said, HEAVENGATE is extremely useful.
Undead enemies often have enormous HP pools or obnoxious special abilities, and HEAVENGATE can Expel an entire group of Undead in one shot at a very high rate.
(And unlike the usual Nifram– or Turn Undead-style ability, you still receive the full EXP reward.)
Offensive magic may be awkward, but Mage absolutely earns its keep as a buff/debuff specialist in boss fights.
SLOW and HASTE manipulate Agility, swinging damage dealt, damage received, accuracy, and evasion in your favor all at once.
ARMOR BREAK is also an extremely valuable debuff against boss-class enemies.
Between its buff/debuff toolkit and its quasi-Turn Undead role, Mage somehow ends up feeling more Priest-like than the actual Priest.
Starting class bonus: Wisdom +1
Mastery bonus: Wisdom +3, Piety +1
Equipment: Knife, Wand, Magic gear
Base Skill
Spell M5
Allows the use of all Mage spells.
Mechanically, it works the same way as the Priest’s Spell P5 Base Skill; only the spell list differs.
Spell M5 is unlocked after defeating Rune, the boss of Sage’s Shrine.
Sub Skills
Spell M1~M5
Allows the use of Mage spells.
Required Skill points, from M1 to M5: 20, 60, 120, 220, 400
Functionally, this is the Mage equivalent of the Priest’s Spell P1~P5.
Reflect
While using the Guard command, creates a barrier that reflects spells.
Required Skill points: 500
There are a lot of situations where going on the offensive reduces incoming damage more effectively than turtling up, so this skill has fairly limited applications.
The only time I personally used it was against Rune, the boss of Sage’s Shrine.
Rune just keeps machine-gunning spells at you, so you can shut the fight down by repeatedly using Guard with Reflect.
…Actually, it gets even sillier.
Rune uses SILENCE at high frequency.
If you reflect that SILENCE back at Rune, the boss suddenly can’t do anything.
Then you just beat the poor bastard into the floor.
Fight over.
Thief
A class packed with exploration-related skills.
…Except, if I’m being real, once you have Detection, Vigilance, and the mastery bonus…
What exactly am I supposed to do with the rest?
Still, let’s give credit where it’s due.
Detection directly increases the number of treasure chests from which you actually get items.
Vigilance is extremely useful for preventing accidents in a game built around rapid chains of battles.
And the Agility mastery bonus helps you get buffs and debuffs out before the enemy acts, land enough damage to kill enemies before their turns, and improve both accuracy and evasion.
Those three things are unquestionably useful.
As for the rest of the toolkit, I struggled to find situations where I could make particularly good use of it.
Starting class bonus: Unknown
Mastery bonus: Agility +3
Equipment: Knife, Bow, Shield, Dogi, Light gear
Base Skill
Detection
Detects treasure-chest traps and disarms every trap except alarms.
The game doesn’t explain this, but normally, if a treasure-chest trap activates, you lose the opportunity to obtain the item inside.
If Detection successfully disarms the trap, however, you still receive the item.
So it not only neutralizes the trap itself—it also prevents you from losing the treasure.
Having at least one character with Detection makes treasure hunting much more comfortable.
Outside boss battles, it’s the kind of skill you can leave permanently equipped without really regretting it.
Sub Skills
Hide
Allows the use of Hide. An Ambush performed after hiding always hits.
Required Skill points: 30
Sorry.
I have literally never used this skill.
Loot Sense
Makes treasure chests visible even when they are outside your normal field of view.
Required Skill points: 175
It’s convenient, sure.
The problem is that the maps in this game are fixed, while the main development strategy is repeatedly slaughtering enemies for Skill points.
Rather than using Loot Sense to decide which routes are worth taking, I found it both easier and more profitable to just mow down everything in my path and sweep every route I could reach anyway.
So I barely used it.
Vigilance
Prevents surprise attacks even when an enemy contacts you from the side or rear.
Required Skill points: 270
This skill is, quite frankly, god-tier.
During normal progression—or when you’re punching above your weight to hunt better loot—the damage caused by a surprise attack can be enormous.
At the same time, this game is built around fast, repeated symbol encounters.
Even if you carefully line yourself up for every single encounter, eventually you are going to screw one up.
Vigilance is insurance against human error.
For me, this skill basically lived permanently in a Sub Skill slot whenever I wasn’t fighting a boss.
Detection
Same as the Base Skill.
Required Skill points: 450
Archer
I will die on this hill:
Archer is absolutely one of the best hidden-gem classes in the game.
Bows already have excellent offensive power, and combining them with the two-shot Double Shot lets an Archer casually outperform a melee Fighter using a one-handed weapon.
Its naturally high Agility means it can dump that damage into enemies before they act, giving it superb potential for preemptive kills.
Because fast normal attacks are already so powerful, I didn’t use Pin Shot or Aim very often during ordinary battles.
But when those support skills are relevant, they are really relevant.
Against the superboss in particular, they can become the sort of silver bullet that your entire strategy revolves around.
Archer is also the easiest class in the game to master, requiring only 250 Skill points.
That makes it incredibly easy to dip into the class, grab its tools, and immediately improve another build.
Most importantly, it gives magic classes a way to deal high damage, from the back row, at zero MP cost.
That makes it ridiculously easy for them to contribute meaningful damage while conserving MP and staying safe.
Mastery bonus: Agility +1, Vitality +1
Equipment: Knife, Bow, Light gear
Base Skill
Bow Mastery
Allows anyone to equip Bows, grants effectiveness against flying enemies, and increases accuracy by 25%.
Sub Skills
Pin Shot
If the attack lands before the enemy acts, it can prevent that enemy from acting for one turn.
Active Skill.
The action-denial effect is not guaranteed; it activates with some probability.
The game doesn’t mention this, but Pin Shot also reduces damage to roughly 40% of normal.
In ordinary battles, it doesn’t see much use because Double Shot is so powerful.
Against the superboss, however—where reducing the number of enemy actions by even one can be the difference between victory and annihilation—it can become a central part of the entire strategy.
※Video of the superboss being defeated using Pin Shot. Obviously, major spoilers.※
Required Skill points: 20
Aim
The attack is guaranteed to hit, but the user’s action is delayed.
A huge part of Archer’s strength comes from its ability to deal damage before the enemy can act, so under normal circumstances this skill can actually undermine one of the class’s greatest strengths.
Where Aim really shines is when combined with the aforementioned Pin Shot and the Samurai’s Initiative.
That lets you build a character entirely around action denial:
“I will move first. I will hit. And you will NOT get your turn.”
It works even against the superboss.
An absolutely disgusting debuffer.
I love it.
Bow Mastery
Same as the Base Skill.
Required Skill points: 110
This is the equipment-access skill with the lowest Skill point requirement.
Double Shot
Normal attacks with a Bow become two-hit attacks.
Each individual hit deals somewhat less damage.
Passive Skill.
Required Skill points: 250
※Test※ How Much Total Damage Does Double Shot Deal?
Under the following conditions, I performed 30 normal attack hits and 30 Double Shot hits against Goblins in the Tower of Trials.
For Double Shot, I used 15 attack actions, producing a total of 30 individual hits.
Class: Archer. Starting class: Fighter. All classes mastered. Male. Level 99.
Equipment: BEAST KILLER, ROBE of EVASION, SNAKE CAP, MIRACLE RING.
Case 1 (normal attack): Decoy3, Qi Arts, Aim.
Case 2 (Double Shot): Double Shot, Qi Arts, Aim.
Case 1: Normal attack damage
215, 221, 196, 215, 262, 212, 205, 212, 272, 244, 196, 246, 199, 209, 270, 196, 206, 202, 211, 220, 276, 269, 240, 223, 274, 205, 228, 205, 251, 233
Sample size n: 30
Mean: 227.1
Sample variance: 707.197
Case 2: Double Shot damage
For this comparison, I treated the 30 individual hit values as independent observations and ignored which two hits belonged to the same Double Shot action.
221, 177, 203, 186, 195, 166, 204, 182, 211, 201, 166, 198, 217, 187, 208, 174, 168, 176, 199, 153, 151, 192, 167, 200, 218, 216, 201, 180, 152, 159
Sample size n: 30
Mean: 187.6
Sample variance: 444.593
Under that independence assumption, let’s run a two-sided Welch’s t-test at p < 0.05.
| Normal Attack | Double Shot, per hit | |
|---|---|---|
| Sample size | 30 | 30 |
| Mean | 227.1 | 187.6 |
| Sample variance | 707.197 | 444.593 |
| Standard deviation | 26.593 | 21.085 |
Welch’s t-test gives:
t = 6.375
df ≈ 55.13
p = 3.93 × 10⁻⁸
95% CI for the mean difference (Normal Attack − Double Shot per hit): +27.08 to +51.92
So under the stated independence assumption, the per-hit damage difference is statistically significant at p < 0.05, and the 95% confidence interval does not include 0.
Estimating the total damage multiplier
If we assume the damage reduction per Double Shot hit can be expressed as:
original damage × n
then:
187.6 / 227.1 = 0.8260
So each hit deals approximately 82.60% of normal attack damage.
Since Double Shot attacks twice:
0.8260 × 2 = 1.652
That suggests a rough total-damage multiplier of approximately:
1.652×
Bishop
Bishop has the classic sage-style skill setup, learning Spell M/P, which provides access to both Mage and Priest spells…
…but there’s one enormous catch.
Spell M/P is a Sub Skill, not a Base Skill.
Simply becoming a Bishop does not let you cast magic.
You must dedicate at least one Sub Skill slot to Spell M/P just to use spells in the first place.
And since Spell M/P stops at Level 4, if you want to use Level 5 spells you still need to equip either Spell M5 or Spell P5 separately.
Because of this Sub Skill limitation, if your goal is to use both spell systems, Bishop does not simply outperform Priest or Mage.
Compared with a Priest equipping Spell M, or a Mage equipping Spell P, Bishop may simply end up with lower maximum spell levels.
For magic specifically, Bishop works best as a class to pass through when you want a character to dabble in both spell schools while spending only one Sub Skill slot.
Its other major prize is Arcanemind, which requires a colossal 999 Skill points.
And no—the MP-cost reduction isn’t even the main reason I care about it.
The biggest advantage of Arcanemind is that it allows any character to equip Magic gear.
Magic gear includes many pieces with excellent elemental and status resistances.
In the endgame, resistance is life.
Even pure physical fighters can justify learning Arcanemind solely to gain access to those resistance options.
Between the enormous Skill point requirement and the equipment you actually want to use with it, this is very much an endgame skill.
During ordinary progression, the sheer number of Skill points required is the main obstacle.
Equipment: Wand, Magic gear, Light gear
Mastery bonus: Wisdom +2, Piety +2
Base Skill
Identify
Examines monster data.
Sorry.
I’ve used this exactly once.
I have no idea.
Sub Skills
Spell M/P1~4
Allows both Mage and Priest spells to be used from a single Sub Skill slot, but does not provide access to their highest-level spells.
Required Skill points by level: 30, 90, 180, 360
Identify
Same as the Base Skill.
Required Skill points: 100
Arcanemind
Halves MP consumption and allows anyone to equip Magic gear.
Required Skill points: 999—the highest requirement of any skill in the game.
Resistance is the lifeblood of endgame survival, and Magic gear provides relatively easy access to many kinds of resistance.
That makes Arcanemind enormously important when constructing final endgame builds.
Samurai
Dual-wielding is the defining feature of Samurai.
For other classes, the only way to equip two weapons without learning Dual-Wield is to use SILVER GLOVES+, which severely restricts your equipment setup.
Dual-wielding simply lets you attack once with each weapon, so if you have two sufficiently powerful weapons available, the damage output can be excellent.
On the other hand, especially during normal progression, you may find yourself in a situation where you have one excellent Sword and nothing comparable for the second hand.
In that case, Two-Handed can easily deal more damage.
So it depends.
Hell, depending on your equipment, weaponless Barehanded or the Archer’s safe back-row Double Shot can outperform it too.
Samurai can also equip Bows naturally, so if you’ve got a good Bow lying around, putting on Heavy gear and firing from the front row actually works surprisingly well.
The easiest answer is usually just:
swap your gear around and see what happens.
Dual-wielding can also be used for something other than raw offense: resistance stacking.
Many Swords and Katanas provide resistances, so you can equip one weapon as your main damage source and use the second as a resistance stat-stick.
That setup is surprisingly stable.
One thing to keep in mind if you’re building a pure dual-wield damage Samurai: TYRFING, the weapon with the highest Attack Power, is male-only.
Equipment: Knife, Sword, Katana, Bow, Light gear, Heavy gear
Mastery bonus: Strength +1, Wisdom +1
Base Skill
Dual-Wield
Allows a weapon other than a Bow to be equipped in both the right and left hands.
Want damage? Great.
Want more resistances? Also great.
The biggest downside is the treasure-hunting cost: you need to find two good weapons.
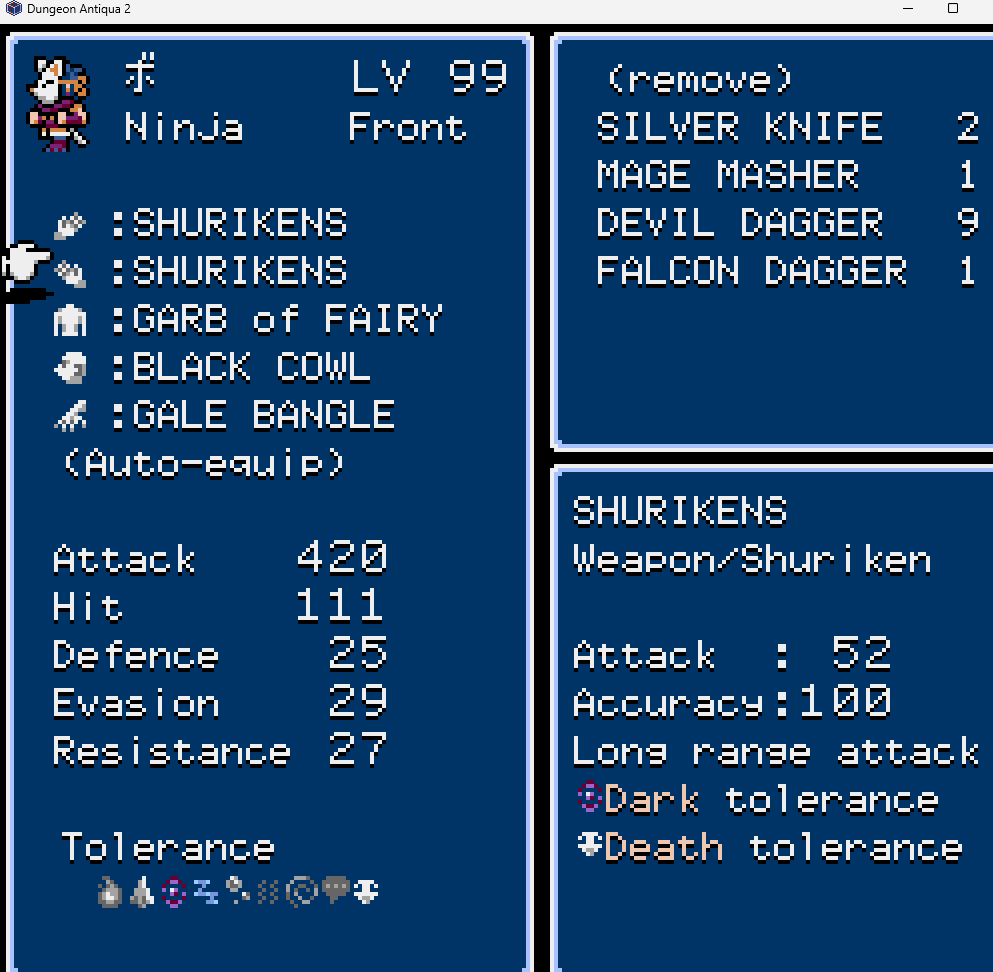
If you learn Dual-Wield through Samurai, you can even dual-wield class-exclusive Paladin or Ninja weapons after changing classes.
Practical?
Maybe.
Cool as hell?
Absolutely.
Sub Skills
Zen mind1~3
Prevents Sleep, Confuse, and Silence with probabilities of 30%, 50%, and 70%, respectively.
Only the highest Zen mind level learned is active; multiple versions cannot stack.
If I’m being real, though…
Inner Steel probably does the job.
Required Skill points: 120, 240, 480
Initiative
Causes Attack, Hide, Slash, and Pin Shot to always act first.
Aside from simply securing first strike to kill an enemy before it moves, this is crucial for making the Pin Shot + Aim combo work.
Pin Shot only does its job if it lands before the enemy acts, while Aim normally delays the user’s action.
Initiative solves that contradiction.
Required Skill points: 150
Dual-Wield
Same as the Base Skill.
Required Skill points: 640
Paladin
A tank whose Cover skill provides excellent stability both under automatic play and manual control.
Paladin-exclusive Holy gear is absurdly well-rounded, with excellent Attack Power, Defense, and resistances.
Once you assemble the full set, your Paladin becomes both extremely durable and surprisingly destructive.
Even before you have the complete equipment set, the class performs perfectly well by simply hitting things and using Cover whenever the situation demands it.
If what you want is simply “one reliably useful party member”, putting a Paladin in the team is a very safe choice.
Base Skill
Cover
Automatically intercepts single-target attacks aimed at allies who are suffering from status ailments or are near death.
You can also select Cover manually as a command.
One catch: the Paladin apparently does not take its own remaining HP into account before jumping in front of the attack.
So yes.
Sometimes your brave heroic tank covers somebody…
…and then immediately dies because they couldn’t actually survive the hit.
One useful technique is to deliberately leave allies near death.
Doing so can allow the Paladin to Cover multiple characters during the same turn.
This is particularly effective before you have enough resistance equipment for the whole party.
Prioritize resistance gear on the Paladin, then let everyone else survive by hiding behind them.
One important limitation:
Cover does not stop party-wide attacks.
Those go straight through.
Sub Skills
Pledge1~3
Prevents Power Hits and additional effects from physical attacks with probabilities of 30%, 50%, and 70%, respectively.
Only the highest learned version is active; multiple levels do not stack.
Required Skill points: 120, 240, 480
Eq Shields
Allows any character to equip Shields.
Shields are extremely useful in this game despite being restricted to relatively few classes, so this is an excellent option if you want to reinforce a character’s defenses.
Required Skill points: 150
Cover
Same as the Base Skill.
Required Skill points: 550
Ninja
Ninja’s defining feature is Lethal, which can kill an enemy in a single blow.
This is especially useful because even ordinary enemies in this game can have huge HP pools or use breath attacks that become more powerful as their HP falls.
Being able to simply delete those enemies is extremely convenient.
The evasion boost from Decoy can, when fully developed, provide avoidance comparable to some of the best Shields in the game, making front-line characters significantly more stable.
The Ninja-exclusive SHURIKENS aren’t actually that impressive as raw weapons.
Frankly, if all you care about is damage, learning Barehanded and punching things is stronger.
Their real advantage is that they provide valuable Dark and Death resistance in a weapon slot.
That frees up your other equipment slots and gives you much more flexibility when assembling your resistance setup and skill configuration.
So, basically:
think of SHURIKENS as resistance accessories that happen to occupy your hands.
Base Skill
Lethal
Occasionally kills an enemy instantly when attacking.
Unlike the usual public image of instant-kill abilities, this actually works perfectly well against Undead too.
By feel, though?
It triggers really damn rarely.
Sub Skills
Decoy1~3
Increases evasion by 20%, 30%, and 40%, respectively.
Only the highest learned Decoy level is active, and multiple versions cannot stack.
It does not stack with the effects of Shields.
Required Skill points: 50, 100, 200
Lethal
Same as the Base Skill.
Required Skill points: 450
Battlemind
Increases the activation rates of additional attack effects, Power Hit, and Retaliate.
In practice, I couldn’t really feel much of a difference.
Required Skill points: 800
※Test※ How Often Does Lethal Activate?
Case A: One Weapon
Class: Ninja. Starting class: Fighter. All classes mastered. Male. Level 99.
Equipment: SHURIKENS, ROBE of EVASION, BLACK COWL, MIRACLE RING.
Skills: Qi Arts, Aim, Decoy3.
Working under the rough assumption that:
“These are early-game trash mobs, so they probably don’t have individual instant-Death resistance settings… probably.”
I performed 100 normal attacks against enemies in the Tower of Trials.
Lethal activated 12 times.
Case B: Two Weapons (= Two Hits)
Class: Ninja. Starting class: Fighter. All classes mastered. Male. Level 99.
Equipment: SHURIKENS, SHURIKENS, ROBE of EVASION, BLACK COWL, MIRACLE RING.
Skills: Qi Arts, Aim, Dual-Wield.
Under the same assumption, I performed another 100 normal attack actions against trash mobs in the Tower of Trials.
Lethal activated 8 times.
Comparing Case A and Case B
Let’s compare Case A and Case B with a chi-square test.
Significance level: p < 0.05
| Lethal Activated | Did Not Activate | Total | |
|---|---|---|---|
| One weapon | 12 | 88 | 100 |
| Dual-Wield | 8 | 92 | 100 |
| Total | 20 | 180 | 200 |
χ² = 0.889
df = 1
p = 0.346
95% CI for the difference in activation rates (one weapon − Dual-Wield): −4.3 to +12.3 percentage points
Since p > 0.05, this test does not provide statistically significant evidence of a difference in Lethal activation rates.
The 95% confidence interval also includes 0.
In other words, these data are compatible with no difference at all—and they are even compatible with a modestly higher true Lethal rate under Dual-Wield.
So the simple version is:
this experiment does not let us determine whether one weapon and Dual-Wield actually have different Lethal activation rates.
Two Hypotheses Suggested by the Results
In this experiment, I found no statistically significant difference between the observed Lethal rates for one weapon and Dual-Wield.
But come on.
That makes absolutely no intuitive sense.
I CAN SEE TWO HITS!
If it’s hitting twice, then it should be rolling the probability twice, right?!
If each hit independently had the same 12% Lethal probability observed in Case A, then:
1 − (1 − 0.12)² = 0.2256
So a two-hit attack should have about a 22.56% chance of triggering Lethal at least once!
IT SHOULD BE AROUND 22%!!
TOTORO IS REAL, DAMMIT!!
…Ahem.
So I can think of two hypotheses.
- Hypothesis 1: There genuinely is no difference. Internally, the game does not roll Lethal separately for each hit. Instead, it performs one Lethal check for each attack command.
- Hypothesis 2: The game normally does roll Lethal separately for each hit, but the level difference in this experiment was so large that the first hit killed the enemy. The attack sequence then ended before the second hit—and therefore before the second potential Lethal check—was ever reached.
To settle this, the obvious experiment would be:
“Test one weapon versus Dual-Wield against enemies that cannot be killed by the first hit.”
Great!
Except enemies tough enough to survive those hits are also tough enough to potentially murder my entire party while I’m trying to grind out a decent sample size.
GODDAMMIT!!!
※Test※ How Much Does Battlemind Increase Lethal Activation Rate?
Battlemind is one of those skills whose effect is surprisingly hard to feel during normal play.
So how much does it actually change Lethal activation?
Under the following conditions, I equipped Battlemind and attacked enemies in the Tower of Trials 100 times, recording each Lethal activation.
Class: Ninja. Starting class: Fighter. All classes mastered. Male. Level 99.
Equipment: SHURIKENS, ROBE of EVASION, BLACK COWL, MIRACLE RING.
Skills: Qi Arts, Aim, Battlemind.
Lethal activated 22 times.
Let’s compare this with Case A from the previous Lethal test using a chi-square test.
Significance level: p < 0.05
| Lethal Activated | Did Not Activate | Total | |
|---|---|---|---|
| Without Battlemind | 12 | 88 | 100 |
| With Battlemind | 22 | 78 | 100 |
| Total | 34 | 166 | 200 |
χ² = 3.544
df = 1
p = 0.0598
95% CI for the difference in activation rates (Battlemind − no Battlemind): −0.3 to +20.3 percentage points
…
ARE YOU SERIOUS???
Since p > 0.05, the data do not provide sufficient evidence at the 5% significance level to reject the null hypothesis that the Lethal activation rates are equal.
The 95% confidence interval also includes 0.
So although the observed activation rate rose from 12% to 22%, this sample remains statistically compatible with no true difference.
…Look.
Yes.
I did write that Battlemind was hard to notice by feel.
But I didn’t expect the experiment to come back with:
“Yeah, there is genuinely still statistical uncertainty about whether it affects Lethal at all.”
One possible explanation is that Battlemind increases the activation rates of various additional effects, but Lethal simply isn’t included among them.
Maybe.
Possibly.
And this—THIS RIGHT HERE—is why I can’t stop playing games.
You run an experiment expecting one answer, and then the game throws this nonsense at you!
I LOVE THIS STUFF!!!
※Test※ How Much Does Battlemind Increase Power Hit Activation Rate?
Since we’ve come this far, let’s test Battlemind’s effect on Power Hit as well.
Class: Fighter. Starting class: Fighter. All classes mastered. Male. Level 99.
Equipment: TYRFING, ANCIENT ARMOR, BRAGI’S HELM, ANCIENT GLOVES.
Skills: Qi Arts, Power Hit, Battlemind.
I performed 100 normal attacks against trash mobs in the Tower of Trials.
Power Hit activated 31 times.
As usual, let’s run a chi-square test at p < 0.05.
The comparison group is the Fighter + Power Hit test from earlier in the article.
| Power Hit Activated | Did Not Activate | Total | |
|---|---|---|---|
| Without Battlemind | 14 | 86 | 100 |
| With Battlemind | 31 | 69 | 100 |
| Total | 45 | 155 | 200 |
χ² = 8.287
df = 1
p = 0.00399
95% CI for the difference in activation rates (Battlemind − no Battlemind): +5.7 to +28.3 percentage points
Since p < 0.05, there is a statistically significant difference between the two groups.
In other words, the data are inconsistent with the idea that Battlemind and Power Hit activation are completely unrelated.
The 95% confidence interval is still fairly wide, so the exact size of the effect remains uncertain.
But the interval lies entirely above zero, giving us solid evidence that Battlemind really does increase the Power Hit activation rate.
In this sample, the observed activation rate increased by 17 percentage points, from 14% to 31%.
…
That’s reassuring.
All right.
One last experiment.
※Test※ How Much Does Battlemind Increase Retaliate Activation Rate?
For the final experiment in this article, let’s measure Battlemind’s effect on Retaliate.
Class: Monk. Starting class: Fighter. All classes mastered. Male. Level 99.
Equipment: Bare hand, Bare hand, ROBE of EVASION, BLACK COWL, MIRACLE RING.
Skills: Retaliate, Battlemind, Qi Arts.
I let trash mobs in the Tower of Trials attack me 100 times and counted how often Retaliate triggered.
The result?
55 counterattacks.
You think I’m making that up, don’t you?
Nope. That’s the actual number.
All right, let’s calculate.
As usual:
Significance level: p < 0.05
| Retaliate Activated | Did Not Activate | Total | |
|---|---|---|---|
| Without Battlemind | 24 | 76 | 100 |
| With Battlemind | 55 | 45 | 100 |
| Total | 79 | 121 | 200 |
χ² = 20.107
df = 1
p = 7.32 × 10⁻⁶ (approximately 0.0000073)
95% CI for the difference in activation rates (Battlemind − no Battlemind): +18.1 to +43.9 percentage points
This is statistically significant at p < 0.05.
The observed Retaliate activation rate increased by 31 percentage points, from 24% to 55%.
Yeah.
This one is not subtle.
Even while I was collecting the data, Retaliate was firing off constantly at a level you could very obviously feel in actual play.
And honestly?
It was pretty damn fun.
Interested in Dungeon Antiqua?
This site also features a review and several guides for the original Dungeon Antiqua.
Anyone who discovered the series through this game may want to check them out.
- Dungeon Antiqua – My Thoughts After Beating the Secret HARD Boss
- *Dungeon Antiqua* Guides after completion
- Dungeon Antiqua Guide: Picking Jobs Based on Gender and Gear
Return to Dungeon Antiqua Series Hub
I’m also active on X, so I’d be thrilled if you followed me there!