This post is also available in:
Welcome to part six of my attempt to level a Warder from scratch in Grim Dawn!!
Last time, I used Grim Tools to rethink my leveling plan.
This time, I’ll keep adjusting that plan on the fly as I push all the way to the final boss of Normal difficulty.
- Balance a skill’s effectiveness against its Energy cost when deciding how far to level it.
- Around 20–30% Aether and Chaos Resistance makes the second half of Normal much more manageable.
- Damage Absorption can dramatically increase your survivability.
With that out of the way, let’s get into it.
- Just Three More Points in Primal Strike Drained My Energy
- Enemy Vitality Damage Hurts
- If You Can’t Find the Aetherial Amalgamation
- Faction Choice: Kymon’s Chosen or the Order of Death’s Vigil?
- Complete the Inventory Expansion Quests
- Aether and Chaos Resistance Matter in the Second Half of Normal
- Use Your Stash to Save Resistance Gear
- Menhir’s Bulwark Stabilizes Your Defenses
- The Final Boss Goes Down Without Much Trouble
- Taking On Elite Difficulty
Just Three More Points in Primal Strike Drained My Energy
Based on the damage calculations from the previous entry, I learned that raising Primal Strike itself was the fastest way to increase my damage.
So I put a few more points into Primal Strike.
And sure enough, Hero monsters became much easier to kill!!
…Unfortunately, my Energy consumption also became far more serious than I had expected.
My damage already seemed high enough, so I decided to stop investing in it for the time being. From here, I would raise the Soldier Mastery bar and work toward Menhir’s Bulwark to improve my survivability.
I was also counting on the additional Health gained from advancing the Soldier Mastery bar.
Enemy Vitality Damage Hurts
Because I had not finished replacing my equipment yet, my Vitality Resistance was sitting at only around 9%.
As a result, enemy Vitality damage hurt like hell.
As a quick visual reference, hazy red clouds and red magic-circle effects are often signs that an enemy is using Vitality damage.
I continued onward while gradually patching up my resistances with equipment I found along the way.
If You Can’t Find the Aetherial Amalgamation
I continued progressing through the main quest by following the instructions in the quest journal.
Without getting too deep into spoiler territory, here is one location that may be slightly confusing.
When leaving Homestead to defeat the Aetherial Amalgamation, head through the northwestern gate, follow the wagon tracks, and travel counterclockwise toward the boss.
Faction Choice: Kymon’s Chosen or the Order of Death’s Vigil?
As you progress through the main quest, you will eventually be forced to choose between Kymon’s Chosen and the Order of Death’s Vigil.
For this character, I chose Kymon’s Chosen.
The main reason is that many of the augments and equipment sold by its faction vendor support Physical and Lightning damage, both of which work well with a Warder.
You can choose the opposing faction when playing on a different difficulty.
However, doing so will reset your reputation with the faction you previously joined, so be careful.
Complete the Inventory Expansion Quests
After reaching Homestead, you can complete two quests that expand your inventory.
Culling the Swarm
This quest is offered by Douglass in Homestead.
First, complete the prerequisite quest, Infested Fields, by destroying the Dermapteran Egg Clusters. Speak to Douglass again afterward to receive Culling the Swarm.
Somewhere in the fields northwest of the Rotting Croplands Rift, you will find a large hole leading into the Royal Hive.
Enter the hive, defeat the two minibosses, and collect their Pheromone Glands.
You can then use the glands to open the gate leading deeper into the hive. Defeat the boss waiting beyond it to complete the objective.
Your inventory will be expanded by one stage as soon as you report back to Douglass.
Precious Resources
Precious Resources is offered by Weapons Master Edric at Fort Ikon.
You will be visiting the Fort Ikon Armory as part of the main quest anyway, so accepting this quest beforehand will save you from having to make a second trip.
Retrieve the supplies from the chest inside the Fort Ikon Armory and deliver them to Edric to complete the quest.
Your inventory will then be expanded by another stage.
Your inventory can be expanded a total of four times. Once you have received all four additional inventory bags, that is the maximum.
Aether and Chaos Resistance Matter in the Second Half of Normal
Once you reach Homestead and enter the latter half of Normal difficulty, Aether and Chaos Resistance become significantly more important.
The corrupted forests beyond Homestead, in particular, are packed with enemies that use Chaos damage.
Named quest bosses can sometimes kill you in a single critical hit if your resistances or Defensive Ability are too low.
Fortunately, many enemies that you are absolutely required to defeat for the main quest do not actually deal that much damage.
When you encounter a quest boss that you still cannot defeat after several attempts, it may be smoother to leave it alone for the moment.
Continue progressing through the main quest, collect equipment with better resistances, and then return for another attempt later.
For the time being, I was able to progress fairly comfortably with around 20–30% Aether and Chaos Resistance.
Of course, the fact that Warders are ridiculously tough also contributed to that stability.
Simply advancing the Mastery bars rapidly increases their base Health and Physique.
The combination of a large Health pool, strong Health Regeneration, and enough Defensive Ability to reduce the risk of enemy critical hits gives the class excellent overall stability.
Use Your Stash to Save Resistance Gear
Starting around the time you reach Homestead, equipment with high resistance values will begin dropping more frequently.
Make good use of your stash.
Even when you do not currently need a piece of equipment, consider saving it if it provides a large amount of resistance.
As a general rule, fill the holes in your resistances one by one, starting with whichever resistance is currently lowest.
Doing this should help you avoid being instantly killed by enemy attacks.
Menhir’s Bulwark Stabilizes Your Defenses
Menhir’s Bulwark is a skill that can only be used while wielding a two-handed weapon or a shield.
At maximum rank, it grants 15% Damage Absorption.
This means that after incoming damage has already been reduced by your armor and resistances, Menhir’s Bulwark can cut the remaining damage by another 15%.
Hearing “15%” by itself may not immediately sound especially large or small.
However, Grim Dawn’s combat is fundamentally built around continuously recovering Health through ADCtH and Health Regeneration while trading blows with enemies.
Under those conditions, Damage Absorption can easily become the deciding factor in whether you win or lose a damage race.
You need to raise the Soldier Mastery bar to 50 before you can unlock Menhir’s Bulwark.
The additional Health and Defensive Ability gained while advancing the Mastery bar also contribute to making the character significantly tougher.
During this playthrough, I reached the final boss just as I finished maxing out Menhir’s Bulwark.
The Final Boss Goes Down Without Much Trouble
As you would expect from a final boss, it took a reasonable amount of time to chew through its Health.
However, I had upgraded my equipment along the way and raised Menhir’s Bulwark to its maximum level.
As a result, there were no particularly dangerous moments, and the boss went down without much trouble.
The only real precaution I needed was to drink a potion and briefly disengage whenever my Health started getting low.
For reference, my character was exactly level 40 after defeating the boss.
Taking On Elite Difficulty
Defeating the final boss unlocks Elite and Ultimate difficulty.
When the DLC is installed, you can also continue into the Act 5 and Act 6 expansion areas while remaining on Normal difficulty.
Choosing Elite does not permanently prevent you from playing on Normal.
You can return to Normal at any time simply by changing the difficulty setting.
For this series, however, I have decided to move on to Elite.
There are several reasons for this:
- Higher-quality equipment drops much more frequently on Elite.
- Faction reputation is easier to earn on Elite, allowing earlier access to faction equipment and augments.
- Acts 5 and 6 on Normal can, depending on your character, be harder than the beginning of Elite.
Starting with the next entry, I’ll be farming and progressing through Elite difficulty.
I have also begun to notice more missed attacks against boss-class enemies.
On top of that, enemies gain additional Lightning Resistance on Elite.
From here, I plan to increase my damage by investing in the following skills:
- Fighting Spirit and Squad Tactics to increase Offensive Ability
- Raging Tempest to reduce enemy Elemental Resistance, including Lightning Resistance
Grim Tool is below.
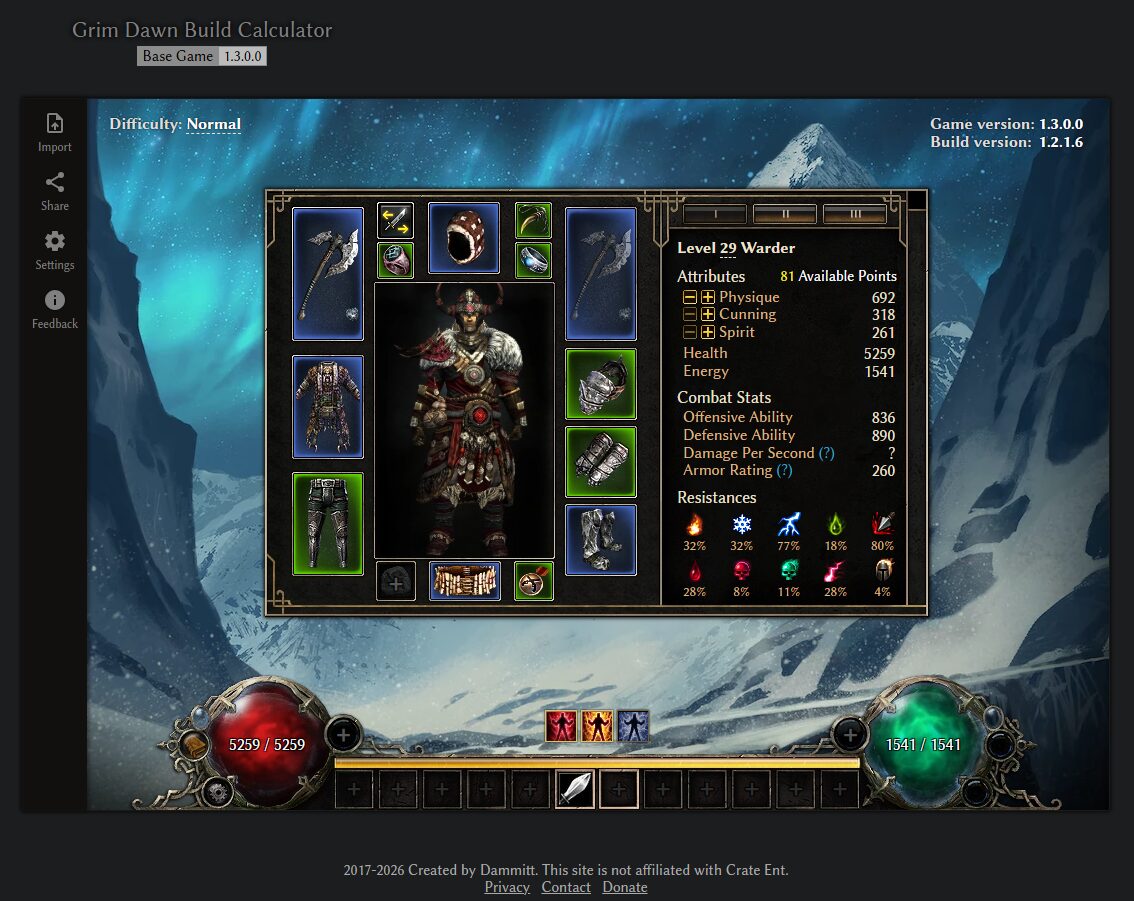
https://www.grimtools.com/calc/NkB1ma6Z
And with that, enjoy your gaming life!
Thank you very much for reading all the way to the end!!
Previous log: Struggling with Bosses? Reassessing Damage, Resistances, and Skill Efficiency with Grim Tools [Warder from a Fresh Start #5]